





















































Merchants, meet your next big ecommerce opportunity: Walmart Marketplace.
Since Walmart began welcoming third party sellers in 2016, they’ve shaken up the ecommerce scene. Sellers are excited, and for good reason.
The site sees over 100 million unique visitors per month and is the second-most visited ecommerce site in the United States. To say this is a promising platform would be putting it mildly.

The good news is getting products listed on Walmart is a lot less complex than other marketplaces.
However, it is worth noting, the platform benefits some merchants far more than others. Additionally, like all ecommerce channels, Walmart has some important requirements you should address before you can begin selling.
To help you set up shop on the Web’s fastest-growing marketplace, we’ve put together this guide outlining the steps you need to take to secure your spot and start building your reputation on Walmart.com.
Walmart is not yet open to all merchants, but those who are accepted have a lot to look forward to. Besides being the fastest growing marketplace, Walmart has already built up a large following and attracts millions of customers. This means more exposure for your products and brand! Not to mention, with the limited amount of sellers they are allowing in, you will have minimal competition to worry about.
According to Walmart, they choose sellers based on reputation, sales projections and alignment with their values. Walmart is known for good prices, so they are looking for merchants who price their products competitively. Other seller qualities include exceptional customer service, a unique product assortment, and fast and reliable fulfillment.
If you think that your brand meets these qualifications, it is time to apply.
As a preferred partner to Walmart, our clients have been given access to a VIP invite form that will expedite the review of your sign up.
Once you request an invite, Walmart will send you an application to fill out. After that’s completed, you wait for Walmart to contact you with their approval. Once approved, Walmart.com's on-boarding team will provide your login to the Walmart.com marketplace seller portal. You will be expected to complete the on-boarding process in 1-2 weeks.
Now that you are an approved seller, it’s time to set up your Walmart account.
We’ll go over the basics of setting up the account, but for additional details check out Walmart’s getting started guide in their Knowledge Base. They have an extremely user-friendly and extensive knowledge base.
a. The first step is to complete the Signup Wizard. Walmart will email you with access to the Signup Wizard. Have the below information available before beginning to fill this out.
Within your account, there is a ‘Launch Checklist.’ As you complete the tasks, mark them as done.
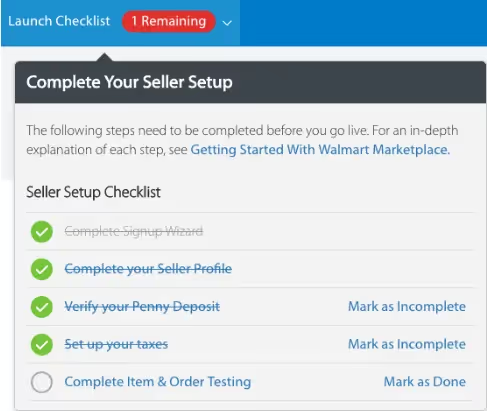
b. The next step on your Launch Checklist is to complete your Seller Profile, which provides a representation of your company to potential customers shopping on Walmart. This includes the following information:
24 hours after you’ve provided your bank information through the signup wizard, your bank account will receive a deposit of a penny. After you’ve verified that you’ve received the penny deposit, mark this as done in your Launch Checklist.
c. Next up on the Launch Checklist is setting up your taxes. This includes:
As we mentioned before, if you have any questions regarding account setup, check the KnowledgeBase. If you still are having issues, contact Walmart directly.
Now we’re on to the fun stuff -- and our specialty -- building your feed!
Walmart has 3 integration options:
If you are using the API integration method, you will need to retrieve your Consumer ID and Secret Key from your Seller Center account.
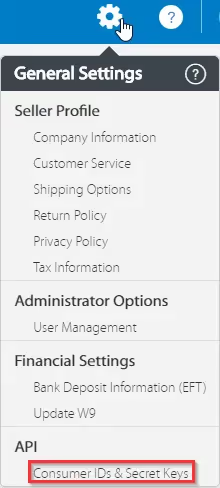
If you need to see the secret key again in the future, you will need to regenerate it by clicking on the Regenerate Key button.
Product Attributes
In their Knowledge Base, Walmart provides a detailed list of common item attributes used in a setup. While some of them are basic such as product name, others like Shelf Description are unfamiliar territory for many merchants. We’ve highlighted some of the important aspects below.
Product Identification Attributes
Description Attributes
Image Attributes
Images are important. After all, a picture is worth 1,000 words. While we are on the topic of images, we wanted to briefly touch on some of Walmart’s Main image recommendations.
Tax Attribute
Price Attributes
Shipping Attributes
In November, Walmart announced that it would pre-enable the Free Value Shipping method for all marketplace sellers. If you want to opt-out of this, you will need to create item level shipping overrides using the following fields. These item level overrides can only be done via a feed or a bulk upload and not through the shipping settings within your Walmart account.
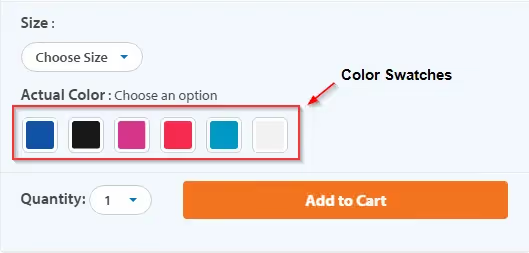
If you have products with variations, you will need to set the variations up within the feed. Variations are products that vary by different attributes, such as size and color. Walmart does not want you to send the parent products, so be sure to leave them out of the feed.
Other attributes depend on the category of your products. Walmart has 24 universal categories that are outlined in their Categorization Guide. Within each category, there are also sub-categories. After you’ve selected the accurate category, you can either use the relevant Excel template or the XSD (if you are using the API), to determine the required and recommended attributes. For example, if you are selling dress shirts, you would want to include dressShirtSize and possibly the collarType.
Additional attributes that rely on category selection are compliance attributes. If you are selling food, you can utilize the Has GMOs field along with the GMO-Free Claim field.
Now that your attributes are all set, let’s talk about submitting your product feed to Walmart.
Before you submit your entire feed, Walmart suggests that you either send a test batch with 10% of your total SKUs or 1,000 SKUs total. To narrow the SKU count down, try submitting only certain brands to start. Don’t worry though, after Walmart reviews your account you can send the rest of your products.
After you’ve chosen which products to send, go ahead and submit according to your integration method. You’ll be able to check product specific errors in the ‘Feed Status’ tab of your Seller Center account.
While these uploaded products will be in Stage status, meaning they are not live, you’ll be able to preview what the prices and content look like. To do so, click on the Preview Item link under Item Details.
How are you fulfilling orders?
The merchant is responsible for handling shipping, exchanges, returns and customer service. With that being said, you must determine how you plan on fulfilling your orders on Walmart.
After you’ve determine your method, you will need to proceed with testing your orders.
Once the items are purchased, you will need to test the below scenarios
Now that you’ve completed your item and order testing, mark it as done in your Launch Checklist. A pop up will then appear confirming if you are ready to launch. Click yes.
The Walmart Integration team will review your account and make your listings live. And just like that, you are a Walmart seller!
As with any channel, it is important to continuously monitor your account. Use the Manage Item page to see your published items, items with errors and to see if you won the buy box.
Walmart has the potential to help your products reach millions of new customers. But only if you take that important first step and begin the approval process. Lucky for you, we’re here to help. If you have questions on how to get your products listed -- not just on Walmart but on any marketplace -- don’t hesitate to ask our ecommerce experts.
Lin is Director of PR and Communications at GoDataFeed, a multi-channel feed automation and optimization platform that helps thousands of retailers sell more on 60+ ecommerce channels.
Run a free feed audit and see which of your titles are matching queries you'd never choose to bid on.

.avif)