


- https://www.godatafeed.com/blog/how-to-set-up-product-variations-in-google-shopping
- https://support.google.com/merchants/answer/6324487
- https://support.google.com/merchants/#topic=7259123
- https://www.godatafeed.com/blog/how-to-set-up-product-variations-in-google-shopping
- https://www.volusion.com/blog/7-major-google-shopping-image-mistakes/
- https://www.wordstream.com/blog/ws/2022/05/18/search-advertising-benchmarks
- https://searchengineland.com/improve-shopping-ad-performance-quality-score-195887
- https://www.youtube.com/watch?v=ZrU5qL0bPJQ

Last Updated

Reading Time
8
Minutes
Introduction
Google Shopping still reigns supreme among ecommerce marketing platforms. It gives online merchants access to millions of shoppers without taking away the seller’s control to own the sale.
With 1.2 billion monthly active users and 75,000 searches per second, Google maintains it’s top spot as the #1 driver of business to retail sites. In fact, 35%of Google shoppers make their purchase within 5 days of searching for a product. Add to that the fact that it achieves 2x ROAS for advertisers and you begin to understand why Google Shopping is at the heart of our top sellers’ marketing strategies.
Google Shopping provides sellers with a spectrum of options to build with and learn from. Getting started, however, can seem daunting — even to digital marketers with plenty of PPC experience.
That’s why we wrote this guide. To help you navigate the confusing parts of Google Shopping so you can get to the best, most rewarding part (selling!).

This is some text inside of a div block.
Getting Started
What You’ll Need
1. Google account login
This is usually (and most easily) a Gmail account, but it can be something else. Learn more
2. Product data source
This can be your shopping cart, a spreadsheet or a product feed management app. Learn more
3. Google Ads account
This is where you will build campaigns, manage spend and get performance reports. Learn more
4. Merchant Center account
This is where Google accesses, processes and reports on your product data. Learn more
5. Google Analytics account
This allows you to track Google Shopping performance and compare it to other campaigns. Learn more

Setting up your Google Merchant Center
Google Merchant Center is where your product feed lives. It’s also where you will set tax and ship-ping rules, which are required before launching your Shopping ads campaign.
Here are a few tips for setting up your Merchant Center account:
Have access to your domain registrar. You’ll need to verify that you own your site and then claim it for use in Merchant Center. The easiest way to do this is by logging into your domain registrar and giving Google access. This can all be done directly from Merchant Center.
Know your tax and shipping settings. You’ll need to set up both tax and shipping rules under General Settings in Merchant Center. For sales tax, you can enter your rates directly or pick the states you charge sales tax in and allow Google to determine the rate. For shipping, you can choose between a fat rate (which could include free shipping), a rate calculated based on the carriers you use, or a rate based on a rate table or rules.
Link Merchant Center to Google Ads. Under Settings and Ads, click Account Linking. You’ll need a 10-digit Google Ads ID, and you’ll need to be logged in with an email address that has admin access to both Merchant Center and Google Ads.
Merchant Center integration
Now, let’s get to the nitty-gritty: Getting your products into — and approved by — Google.
The way we see it, this process doesn’t have to be a harrowing experience, although it surely can be. It’s easy to get discouraged when you think you’ve done everything right... only to get back a ton of errors and warnings. Granted, this tends to happen more with sellers attempting to set up their feeds manually, but it still happens with content APIs. Some feed management apps like GoDataFeed have a built-in validation system to catch and fix errors before sending data to Google Merchant.
Google is very particular about how it takes in product information. Without in-depth knowledge of data feed management (or a feed management app to close the gap), setting up your Google feed can get complicated.
But that’s why you’re here. Now let’s lift the veil and review the Google Shopping campaign process from start to finish.
Submitting Products to Merchant Center
To submit your products to Google, you have three options.
The manual option
This requires that you have a flat file (csv, txt, xml) of your product data. You will submit by uploading that file into Google, scheduling a fetch or placing it into a Google Sheets document that Merchant Center can access.
This has obvious drawbacks.
For one, the data being submitted will be static. You’ll have almost no ability to manipulate attributes.
And there’s also the issue of limited submissions. Once-daily is the most often your data will be pulled. That’s just not enough to keep your data and inventory fresh and accurate.
The content API option
(aka, native Google apps; i.e., Shopify Google App)
The Content API for Shopping allows apps to interact directly with the Merchant Center platform, vastly increasing the efficiency of managing large or complex Merchant Center accounts. The Content API for Shopping can be used as an input source for product data in Merchant Center, directly delivering your data as it is updated on your site.
This is a much better option for data freshness and inventory accuracy. But it still has drawbacks.
The main problem with this is that it’s little more than a highly efficient data dump. Whatever is in your store is what gets pushed into Merchant Center. Again, you have very little control over how your product ads are presented.
So what’s the better to go about it?
The product feed automation option
You knew it was coming. Here it is. Product feed automation tools not only simplify the Merchant Center integration (like Content API) but they also add a layer of data controls.
With product feed automation tools you can create custom attribute templates. What do we mean by that? Here’s an example… If you’re a shopper looking for size 6 strappy leather sandals, which of the product titles below sound better to you?

Ad 1: “Lunna - Cognac”, or Ad 2: “Women’s Mia Lunna Platform Ankle Strap Sandal, Size 6 M - Red”
What ad do you think a shopper will click on? Ad 2 is the clear winner because it has a more keyword-rich, shopper-centric product title. Using a product feed automation app allows you to manipulate your product data, rearrange it and modify it to make more engaging product ads that make shoppers want to click — and you can automate much of the work by setting up customized templates that generate great listings like these on their own.
But you wouldn’t want that as your product page title. That’d be really long and too specific. Which is why you DO NOT want to push your store data into Merchant Center without modifying it first.

A product feed management tool gives you the ability to modify data at scale and without altering the original source data (your online store, in this case).
Categorizing your products
In order to better understand what you’re selling, Google requires that you assign categories from their product taxonomy to your products.
Despite the importance of this attribute, it’s sometimes optional. Only the following Google Product Categories require this attribute:
- APPAREL & ACCESSORIES > CLOTHING
- APPAREL & ACCESSORIES > SHOES
- APPAREL & ACCESSORIES > CLOTHING ACCESSORIES > SUNGLASSES
- APPAREL & ACCESSORIES > HANDBAGS, WALLETS & CASES > HANDBAGS
- APPAREL & ACCESSORIES > JEWELRY > WATCHES
- MEDIA > BOOKS
- MEDIA > DVDS & VIDEOS
- MEDIA > MUSIC & SOUND RECORDINGS
- SOFTWARE > VIDEO GAME SOFTWARE
Still, it is highly recommended that you apply a google_product_category to each and every one of your products.
Google Product Categories vs Product Type Categories
Product type categories are for your own categorizing, so you can choose whichever values you want for all of your different products. These categories make it easy to immediately compare campaigns just by looking at the reporting in Google Ads.
While that makes them an extremely important part of your marketing strategy, Google Product Categories play a much bigger role in how campaigns actually perform.
An easy way to go about avoiding confusing the two is to use Google’s product taxonomy as your product_type nomenclature system. You can use Google Product Categories as your product_type categories, but not the other way around.
If you decide to reference a different system for your product types, be sure to stay organized and categorize responsibly.
Google Shopping Product Categories Best Practices
Product type categories are for your own categorizing, so you can choose whichever values you want for all of your different products. These categories make it easy to immediately compare campaigns just by looking at the reporting in Google Ads.
While that makes them an extremely important part of your marketing strategy, Google Product Categories play a much bigger role in how campaigns actually perform.
An easy way to go about avoiding confusing the two is to use Google’s product taxonomy as your product_type nomenclature system. You can use Google Product Categories as your product_type categories, but not the other way around.
If you decide to reference a different system for your product types, be sure to stay organized and categorize responsibly.

Review All of Your Options
Going through every single item your company offers can be a time-consuming activity.
Fortunately, once completed, you won’t have to manually go through the entire list again. You’ll only need to check back to make sure new, better-fitting categories haven’t been added.
Now, you probably don’t need to go through all 6,000+ options.
If you start with the right primary category, you should be able to save time and make the correct selections.
Keep an Eye on Your “Best Fit” Categories
What happens if your product doesn’t seem to really fit any category? Even with well over 6,000 options, it’s possible.
Some marketers worry about making the wrong decision so, if their particular product type doesn’t require a category, they just leave it blank.
That’s a big mistake. Remember, at that point, you’re just letting Google guess. Instead, pick the “best fit” and then monitor how your product performs under this category. Keep an eye on the product-category combination’s performance for at least 30 days, then re-categorize if the product does not perform as you’d expect. Continue monitoring and testing until you find the right fit.
Get Everything Else Right
If you have to go with a “best fit” category, that’s all the more reason to make sure that you optimize every last detail of the rest of your Google Shopping Campaign. Otherwise, you may continue to switch your categories, thinking that’s to blame for your poor conversions.
Even if you find a perfect match, don’t stop there. Categories help, but they’re not enough to produce the best possible results on their own.
Check back on your campaigns regularly to look for further opportunities to keep improving their performance.
Managing product variations
If you sell a product that varies by attributes such as color, size, or material, you can group these related products together in your Google Product Listing Ads by using product variations. Instead of having a unique listing for each variation of the same product, setting up variations allows the related products to be housed under a single listing. This streamlines the shopping experience by giving shoppers the ability to easily choose between the different product options.

Google’s supported variants include size, color, material, pattern, age_group, gender, size_type, and size_system. If your product varies by an unsupported attribute, check out Google’s best practices on how to handle these SKUs.
Before you get started with submitting variations to Google, you’ll want to determine if your products vary by one of Google’s supported variant attributes:
- SIZE
- COLOR
- MATERIAL
- PATTERN
- AGE_GROUP
- GENDER
- SIZE_TYPE
- SIZE_SYSTEM
If your products vary by another attribute besides those listed above, don’t set up the variations using item_group_id. Instead, follow Google’s guidelines for submitting unsupported variants.
Parent-child relationships
There must be a way to determine the parent-child relationships in your data and accurately relay this information to Google.
Variant attributes
Besides ensuring that your SKUs vary by a supported variant attribute, you need to confirm that the child SKUs you want to list have a value for at least one of these attributes in your data. For example, if your family varies by color, make sure all child SKUs in that family have a valid value for color.
Setting Up ‘Product Families’
Now that you’ve made sure you have the necessary information, it’s time to get those product families set up on Google. To set up the variations, you will need to group items using the Google field item_group_id.

GOOGLE DEFINES ITEM_GROUP_ID AS:
ID for a group of products that come in different versions (variants). Sellers usually map their Parent SKU values to this field.
Google provides a lengthy list of requirements and best practices when using this field. We’ve highlighted some requirements below.
- Each distinct item group must have a unique value for item_group_id
- Use the same variant attributes for all products with the same item_group_id
- Make sure that the product details displayed on your landing page match the values you provide for each attribute
- The item_group_id field has a 50 character limit and supports alphanumeric values, underscores and dashes
Don’t confusethe “id” fieldwith item_group_id. Theid field should still be unique for all singleproducts. That meansthat each child SKU within one familyshould have a unique valuein the id field.
After you’ve added values for the item_group_id field, you need to add values to your feed file for the attribute that your product varies by. As mentioned before, this can be size, color, material, pattern, age_group, size_type, size_system.
Product variant examples
Let’s look at some apparel examples for context.
Say you are selling a men’s shirt that varies by both size and color. The options for size are small & large and for color are blue and red.
The parent SKU value is 140593. In addition to submitting all of the required fields for clothing & accessories, you would submit the product family using the fields below.

- Item_group_id: 140593
- Id: 140593-S-Red
- Color: RED
- Size: SMALL
- Item_group_id: 140593
- Id: 140593-L-Red
- Color: RED
- Size: LARGE
- Item_group_id: 140593
- Id: 140593-S-Blue
- Color: BLUE
- Size: SMALL
- Item_group_id: 140593
- Id: 140593-M-Blue
- Color: BLUE
- Size: MEDIUM
When to not use item_group_id
Don’t use the item_group_id field if your clothing item isn’t a true variant. Below are two instances
where you should NOT be submitting the item_group_id:
- If you are selling a group of items that are related such as a matching outfit where each piece is sold separately
- If you are selling different styles of a product (i.e., long-sleeves, short sleeves & sweater) with the same design
How to set up variants in your Google feed
Setting up product variations for your Google Shopping product listing ads can be a major headache if you’re unfamiliar with Google’s guidelines. In order to correctly set up variations, your products must vary by one of Google’s supported attributes which include color, size, pattern, material, age group, gender, size type and size system.
If your product differs by an attribute other than the ones listed, you’ll need to follow Google’s best practice guidelines for unsupported variants.
To get you started with setting up variations, we’ve listed out what you need to know about Google Shopping’s supported variant attributes.
PRODUCT VARIANT: COLOR
When adding the colors for your variant products, Google wants you to use more than one letter. For example, instead of writing “R”, write out the full color “red.” Also, you want to make sure the color you are submitting to Google matches the color you’ve listed on your landing page. Don’t submit “blue” to Google and have “turquoise’ listed on your website.
If your product has multiple colors, you can submit one primary color along with two secondary colors using “/”. For example, if your color is mostly black but has gray and white, you can submit “Black/Gray/White.”
Variants for a tote bag that comes in black and brown may read as follows:
Variant A
- title: Stella Tote Bag- Black id: 87649-BL
- color: black
- item_group_id: 87649
Variant B
- title: Stella Tote Bag- Brown id: 87649-BR
- color: brown
- item_group_id: 87649
PRODUCT VARIANT: SIZE
Google wants you to use a standard size value for your target country. They’ve provided a list of examples. It’s also important to be consistent when submitting your size values. If you are selling a sweatshirt that comes in small, medium and large, submit S, M and L. Don’t submit S, M and large.
Shoe sizes depend on a variety of attributes like size, gender and size_system. A pair of women’s shoes that comes in sizes 6 and 7.5 may read follows:
Variant A
- size: 6
- size_system: US
- gender: Female
- title: Tennis Shoes, Womens 6 US id:66483-W-6-US
- item_group_id: 66483
Variant B
- size: 7.5
- size_system: US
- gender: Female
- title: Tennis Shoes, Womens 7.5 US id:66483-W-7.5-US
- item_group_id: 66483
PRODUCT VARIANT: PATTERN
The pattern attribute is used to describe either a pattern (i.e., stripes) or graphic (i.e., sports team logo like a dolphin). You want to be careful not to add a value here that belongs in another attribute such as color or material.
Blouses that vary by a pattern may read as follows:
Variant A
- pattern: stripped
- color: black
- size: 4
- id: 74934-B-ST
- item_group_id: 74934
Variant B
- pattern: polka dots
- color: black
- size: 4
- id: 74934-B-ST
- item_group_id: 74934
PRODUCT VARIANT: MATERIAL
Add the material or fabric that your product is made of to this field. Some examples include leather, suede, polyester and cotton.
Google states that if you are selling a precious metal (i.e., gold or silver), you would submit this information in the material and color attribute.
Ballet Flats that vary by material could read as follows:
Variant A
- size: 6
- material: suede
- color: blue
- title: Suede Ballet Flats, Womens 6
- id: 43290-W-6-S
- item_group_id: 43290
Variant B
- size: 10
- material: denim
- color: blue
- title: Denim Ballet Flats, Womens 10
- id: 43290-W-10-D
- item_group_id: 43290
PRODUCT VARIANT: AGE GROUP
Some products vary by the age demographic that they are targeting. Google’s supported values for age group include: newborn, infant, toddler, kids, and adult.
Flip flops that vary by age_group may have the following values:
Variant A
- size: 6
- size_system: US
- age_group: toddler
- id: 39202-6-US-T
- item_group_id: 39202
Variant B
- size: 6
- size_system: US
- age_group: kids
- id: 39202-6-US-K
- item_group_id: 39202
PRODUCT VARIANT: GENDER
The supported values for this field are male, female or unisex. If your product varies by gender then you need to fill out the gender attribute for all child products.
Google provides the following example for gender variants:
Variant A
- title: Men’s Android Smartwatch - Gold
- gender: male
- material: gold
- id: 9856-m-gold
- item_group_id: 12345
Variant B
- title: Women’s Android Smartwatch - Gold
- gender: female
- material: gold
- id: 9856-w-gold
- item_group_id: 12345
PRODUCT VARIANT: SIZE TYPE
The size type should describe the cut of your product (width, regular, petite). When you don’t submit a value in the size_type field, Google defaults to regular.
If your product varies by the cut of your product, then you’ll need to submit the correct size type for all variant attributes.
Women’s trousers that vary by size_type could read as follows:
Variant A
- title: Women’s Navy Cropped Dress Pants- 6P
- size_type: petite
- size: 6
- gender: female
- id: 4432-6P-US
- item_group_id: 4432
Variant B
- title: Women’s Navy Cropped Dress Pants - 6
- size_type: regular
- size: 6
- gender: female
- id: 4432-6-US
- item_group_id: 4432
PRODUCT VARIANT: SIZE SYSTEM
This attribute is used to describe the country’s size system that you are using. For example, US sizes vs EU sizes.
Variant A
- title: Women’s light Wash Denim, 2
- size_system: US
- size_type: regular
- size: 2
- gender: female
- id: 2293-2-F
- item_group _id: 2293
-
Variant B
- title: Women’s light Wash Denim, 34
- size_system: EU
- size_type: regular
- size: 34
- gender: female id: 2293-34-F
- item_group _id: 2293
Google Shopping feed optimization
Everyone’s talking about optimization these days. It’s one of those marketing keywords everyone loves — but what is it, really?
Well, when it comes to Google Shopping, it means two things:
- Feed optimization - The manipulation of product data to improve performance (i.e., increase impressions, clicks and conversions)
- Campaign optimization - The adjustment of Google Ads settings to improve results (i.e., improve targeting, maximize budget and reduce wasted spend)
For a fully optimized strategy, you’ll need both. In this section we’ll dive into each, starting with the first step toward a successful Google Shopping campaign.

Why are optimized Google Shopping feeds important?
Your product feed determines the look and feel of your product listing ads. The biggest mistake sellers make on Google Shopping is sending exactly what’s in their stores to Google.
Why is that bad?
Because webstores are built around internal information and layout structures that are not present in Google Shopping. When a shopper sees your product in a PLA in Google, they don’t have the same context they have when they’re looking at your product inside your webstore.
In order for a shopper to get the full picture of your product, you’ll need to step up your PLA game.
The quality of your product data, more than anything else, will determine your products’ success on Google Shopping. That’s because Google looks at data quality in order to assign the ad relevance portion of your Quality Score.
Quality Score, which is ultimately what determines whether your products appear for any given search, consists of three parts:
- Ad relevance - How closely related your listing is to the search query.
- Click through rate (CTR) / expected CTR - A ratio showing how often people who see your ad end up clicking it. / How likely it is that your ads will get clicked when shown for that keyword.
- Landing page experience - How well your landing page gives shoppers who click on your ads exactly what they’re looking for.
Let's look at Ad Relevance
Ad relevance, which is measured entirely by the fields in your product feed, is most closely affected by:
- Product Title
- Product Description
- Unique Product Identifiers
- Brand MPN
- GTIN (UPC/EAN)
- Google Product Category
These fields can also drastically improve (or impair) performance metrics like clicks, CTR and conversions. Other important fields that can affect your ad relevance and/or performance metrics:
- Product Type
- Image
- Price
- Apparel Categories
- Sales Tax
- Shipping
- Additional required fields
- Availability
- Condition
- Custom Labels
How to optimize a Google Feed
Product Title
Google uses your product titles to determine if your listing is applicable to a specific search query. If your title is lacking keywords that shoppers are searching for, it’s likely that your listing will not be returned in their search result. And just like that, you’re missing out on a potential sales opportunity.
Google isn’t the only one who cares about your product titles. Shoppers do too. The title, next to the image, is one of the more noticeable parts of the listing. Titles should highlight the most relevant product attributes so that shoppers can easily skim through them and determine if the product is worth clicking on. If a shopper is confused about the details of what you are actually selling, they will simply move on to the next listing.
FOCUS ON KEY PRODUCT FEATURES
What product features are most important to your audience and what features could potentially sway a shopper’s purchasing decision? Include these in your title. Some of the more prominent features we see on listings include brand, product type, size, color and even occasion.
USE SEARCH-SPECIFIC KEYWORDS
What are your target customers searching for? What words are they using in those searches? Use the Search Terms report in Google Ads to see what the highest performing queries are and which ones ended in conversions. Then use these keywords to build your product titles.
USE TITLE STRUCTURE THAT WORKS FOR YOU
Product titles should be descriptive but not long-winded. They should be search-friendly but not “stuffed” with keywords. The formula for the perfect product title will vary for each seller and each product, but here are a few formats we’ve found to be effective.
PLEASE NOTE:
Some of the title attributes that we provide in the following examples may differ for your ad, depending on how you classify your products. It’s important to come up with your own formulas based on what you know about your products and your customers — and test, test, test — before settling on one for good.
ENHANCED PRODUCT TITLE TEMPLATES (EXAMPLES)
Example 1
- TEMPLATE: Brand + Product Type + Gender + Keyword 1 + Keyword 2 + Color + Size
- EXAMPLE: Nike Pro Short Sleeve Training Top Men’s Short Sleeve Pullover Carbon Heather/Black/Black in Large
Example 2
- TEMPLATE: Product Type + Keyword 1 + Keyword 2 + Color + Size
- EXAMPLE: Business Cards - 16 point Matte Finish in Multicolor - Standards Size 3.5” x 2”
Example 3
- TEMPLATE: Brand + Model Number + Material + Product Type + Size + Color
- EXAMPLE: CharBroil Classic 480 40000 Propane Gas Grill with 4 Burners - Black
Product title best practices
- Include top keyword(s)
- Use the most common name of the product
- Use color, brand, gender, size
- Put the important information first (leftmost)
- Include model numbers and other identifiers shoppers might search for
- Do not go over Google’s 150 character limit
- Do not “keyword stuff”
- Do not use promotional text, i.e., “On sale now”
- Do not use “short tail” keywords as titles, i.e., “Little Black Dress”
- Do not use ALL CAPS
Product Description
Product descriptions play a huge role in shopping ad performance. To begin with, Google crawls your product feed to determine if your listing is relevant for different search queries. The keywords you use in both your title and description play a role in Google determining that relevancy.
That’s why it’s important to add accurate and descriptive keywords not only to your titles, but to your descriptions as well.
Besides the search benefits that a good PLA description provides, it also gives you a platform to tell shoppers about your product.
If shoppers are taking the time to read the description, they have seen the image and title and are likely interested in learning more about the item. The description gives you the opportunity to list out product features, technical specifications and give shoppers a reason as to why the product can benefit them.
Descriptions also give you the ability to set the correct expectations about your product.
This could include sizing, use cases and even washing instructions. For example, if your product is dry clean only, you’ll likely want to add this to the description.
Providing this information upfront, before the customer completes the purchase, prevents an unhappy customer and potentially a bad review.
Now that you know the gravity of the product description, let’s jump right into optimizing these valuable fields.
ESTABLISH INFORMATIONAL HIERARCHY
Google Shopping SERPs only show the first 145-180 characters of your product description so it’s important to put the most important information first. If you can fit these key pieces of information within the first 180 characters of your description, even better.
Here’s a list of data points you’ll want to consider as your lead:
- Brand
- Who it’s for
- Product type (e.g., sandal, computer, fish bowl)
- Remaining information from the “always include” list below
ALWAYS INCLUDE THESE IN YOUR DESCRIPTIONS
These are absolute must-haves. That doesn’t mean you can’t go well beyond adding just this information, but it does mean you cannot afford to neglect it if it’s applicable to your products.
Again, try to fit most (or at least some) of these within the first 145-180 characters of text.
- Size
- Shape
- Pattern
- Texture
- Design
- Material
- Intended age range
- Special features
NEVER INCLUDE THESE IN YOUR DESCRIPTIONS
Google is serious about the rules. Stray a little and you’ll be warned. Stray a little more and you can kiss your Ads account goodbye. That’s why it’s so important that your product listings always adhere to Google’s guidelines.
Here are some things your product descriptions should never have:
- Promotional text like “Free shipping” or “On Sale Now”
- BLOCK CAPITALS
- A description that is more about your company or brand than it is about the product itself
- Details or descriptions for other products or accessories
- Comparison to other products that you are selling (e.g., twice as fast as X)
- Links to your store (or other websites)
- Information on billing, payment or sales
- References to categorization systems that you use internally (e.g., Computers > Laptops > Touch Screens Laptops
Unique Product Identifiers
BRAND
As noted in the product title optimization section above, brand is very important to how Google indexes your product listings and how it serves them up to relevant search queries. And that’s just in the title. Google actually requires brand as its own feed attribute.
If it’s your brand, this gives you the opportunity to control how your brand appears in Google Shopping, though it’s important to take into account how your shoppers will look for your brand when they search.
If you’re a retailer, get to know the brands you sell. Run your brand's products through the keyword research process to see how they compare to competitors' listings in high SERP positions.

MPN / GTIN / UPC / EAN
Unique Product Identifiers (UPI) are among the most important attributes in your feed. These are Manufacturer’s Product Number (MPN) and Google Trade Identification Number (GTIN).
The MPN is usually the SKU and the GTIN might be the UPC or ISBN. If you have already provided the Brand for your products (and, yes, you should have), you’ll only need one UPI; either MPN or GTIN. If you have both, though, use both.
It is vital, however, to only submit accurate values in UPI fields. Google uses UPIs to group the products it shows for a search, so the values you enter in UPI fields should be used universally for that product. In other words, all listings in Google Shopping for that product — yours and competitors’ —should share a UPI.
False or incorrect UPIs will prevent Google from matching your products to established product groups, which can severely lower your impression share.
But what if your product doesn’t have a UPI?
That’s OK too. Google allows you to bypass this requirement for products that don’t have Universal Product Identifiers, such as custom products, one-of-a-kind products or products created before GTINs were introduced.
In cases like these, Google allows you to use the field identifier_exists to confirm that a product does not have a UPI, i.e., “identifier_exists = No”. Let’s be clear though, that doesn’t mean you can rely on the identifier_exists attribute when you have a UPI but can’t find it. The identifier_exists value should only be used for products that truly don’t have one, such as:
- Custom T-shirts
- Art
- Handmade goods
- Vintage products
- Antiques
- Books published before 1970
- Other special items
Google Product Category
Google’s category tree is exhaustive but not perfect. Yes, your products will fit into one of its branches. In some cases, your products might fit into multiple branches. But sometimes you’ll have to get creative. Whether that means going with broad categories or very specific categories will depend on your product.
The most important thing to note when categorizing your products is that you want to be as accurate as possible for your intended searches; that means choosing the branch that your shoppers will most likely associate with your product while getting as far down the taxonomy tree as possible.

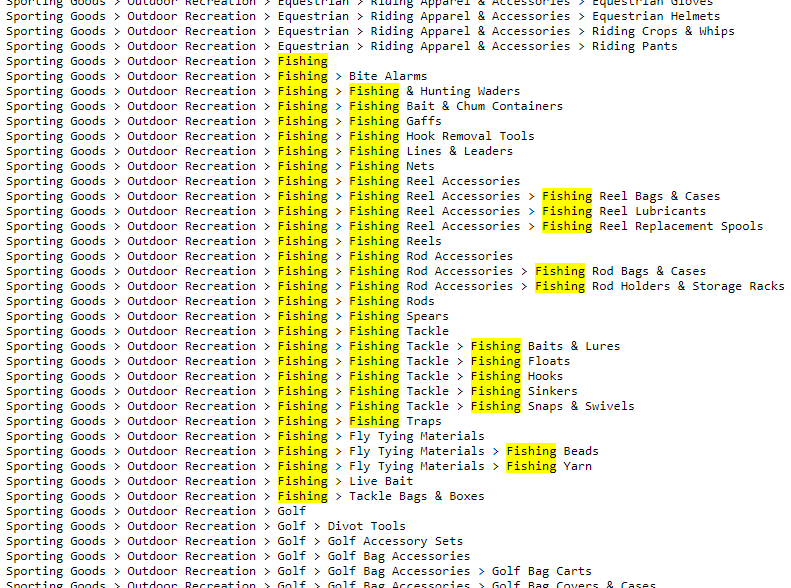
Notice how specific some branches of Fishing get. And yet, there’s no fisherman’s gloves. Or waterproof fly fishing pants. For product category outliers you will have to settle for the closest matching category. For this example, in order to avoid showing up for non-fishing glove search queries, go with the parent branch: Sporting Goods > Outdoor Recreation > Fishing.
USE A CATEGORIZATION ENGINE
There are currently more than 6,000 categories and subcategories in Google’s taxonomy. Fortunately, you don’t have to sift through all of them. Some product feed management tools (like GoDataFeed) provide a category tool for matching products to categories.
This is helpful for many reasons. For one, you don’t have to pore over thousands of lines of text to find the right match for each product. And two, it’s a huge time saver when you have a product catalog that varies widely between categories.
Be sure to do a variety of searches relevant to your product title and keywords, however, in order to uncover the most accurate category.
You can only choose 1 category per product, so it’s important to get right by being as accurate as
possible. Some products will fit neatly into Google’s taxonomy. Some won’t. Get as specific as you can.
For products that are left hanging just 2 or 3 branches into the taxonomy tree, use product_type to further clarify for Google.
Product Type
Product type is immensely helpful in providing clarity to Google about your products. It gives you a measure of control beyond Google’s taxonomy. It’s especially useful to retailers whose products don’t fit neatly into the taxonomy tree.
In order to get the most out of the product_type field:
- Use your store’s categorization as a guide
- Get as far down your category tree as possible, i.e., use the last subcategory in the product page’s “breadcrumb”
For example, consider using a logic like this to assign product_type:
IF:
Google taxonomy = Apparel & Accessories > Shoes
AND:
Your internal = Shoes > men’s shoes > sneakers > running > trail running > Mizuno Wave Hayate 7
THEN:
product_type = trail running shoes
Image Link
A picture’s worth a thousand words. Especially in Google Shopping!
That’s because the images you choose for your listings play a big part in getting shoppers to interact with your PLA. So how do you ensure that each listing is equipped with its best selfie?
USE HIGH-RESOLUTION IMAGES
The challenge with online shopping is that you can’t touch or see the actual product.
That’s why images are so important. Shoppers are basing a lot of their purchasing decisions on the image itself. A poor quality image won’t do your product any justice and could steer shoppers away from buying your product.
Google recommends that your images are at least 800 x 800 pixels. If your photography skills aren’t up to par, it’s a good idea to hire a professional photographer to snap those perfect pictures.
CRAWLABLE IMAGES
Google routinely crawls your images to check for any quality issues.
You’ll want to make sure that they don’t run into any issues when completing this and that your robots.txt file is configured correctly. If they can’t access the image, the product will be disapproved within Merchant Center.
The most common crawl issues stem from giving them the wrong URL, whether it results in a 404 page or has invalid characters or the server’s robot.txt disallows access. They also listed out other possible issues that you can skim through to determine why you may be receiving the error.
IMAGE CONTENT
Now let’s talk about the actual images.
You want your product to stand out. If it’s photographed in a busy background, a shopper may not get a good feel for the actual product and move on to the next listing. For your main image, photograph your product on a white background. That way, it won’t get lost in the shuffle. Google also recommends that the product should take up no less than 75% but no more than 90% of the full image.
Google wants you to accurately display the entire product in the image and include minimal or no product staging. Google wants to give the shoppers a good idea of what you are actually selling with little to no distractions.
We did a search for “black tote bag” and these are the images that came up. As you can see, almost all of them show only the product; even the images that use people in them still manage to make the tote the focal point of the image.
ADDITIONAL IMAGE
Google allows you to submit up to 10 additional images. Photograph your product at multiple angles and views so the shopper can get a good idea of what they are buying. Another idea is to add a close up image of your product. It’s also beneficial to add an action shot of your product. If you are selling a coffee table, add an image of it placed in a living room setting.
For example, if you’re selling a black tote like those above, consider the following alternate image examples:
- At least one image of the tote in use while out on the town
- A close-up image of the hardware
- A close-up image of the tote’s leather grain
- And image from inside the tote
- A close-up image of the handles
- An image of the tote overlaid with with sizing guides
This is your opportunity to show of your product in as many relevant ways as possible.
The additional image field lets you visually answer any questions a shopper might have about the look and feel of the product.
BUNDLED PRODUCTS
If you are selling a group of products in a bundle, your image must show all of the products. Only put the images of products you are actually selling with the main product image.
EXAMPLE:
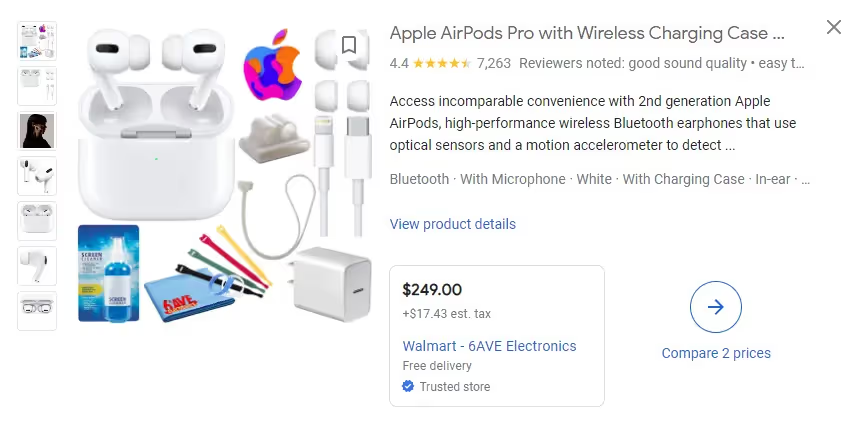
Bundle contents included in image:
- AirPod wireless earphones
- AirPod charger
- AirPod case strap
- Cleaning spray and cloth
- Cable tie-down
FOLLOW GOOGLE’S RULES
Google doesn’t want you to add promotions to your image such as free shipping, retailer name, retailer logo, a call to action or price adjectives, to name a few. Google also wants you to leave out any borders surrounding your images.
Follow these rules to get your products up on Google as quick as possible and to avoid campaign interruptions due to image quality issues:
- Don’t use a generic image, graphic or illustration unless you sell in the hardware, vehicles & parts, or Software > Computer Software category
- Don’t use a logo or icon instead of a product image unless you sell under the Software > Computer Software category
- Don’t use a single-color image that is only a square of a color unless you sell under Vehicle Paint, Craft Paint, Ink & Glaze, or Painting Consumable
Price
More than any other attribute, price will be the determining factor for purchase. Especially if your products are sold by other retailers who are also advertising on Google Shopping.
Before committing to a price, search your products and scope out the competition’s price range and position relative to pricing. Although Google does not report pricing as part of its Quality Score metrics, research shows that increases in selling price negatively affect ad placement and impression share in Google Shopping SERPs.
A study by Search Engine Land found that products whose prices are lower than the market average generate the “lion’s share” of traffic in any given seller’s Google Shopping inventory.
“The difference in impressions,” says Andreas Reiffen, author of the study, “is clear proof that the Google Shopping algorithm favors products with lower prices and therefore serves those product ads for a higher number of relevant searches.”
Apparel-Specific Attributes
Google provides some additional (required and optional) fields for apparel products. These can help
your products in two distinct ways:
- Accepted values inside these fields often match longtail keyword searches
- These attributes are used as levers for filtering within SERPs
Attributes and acceptable values:
Gender (required for apparel):
Male, female, or unisex
Color
Color of product such as Red, Blue, White, Black, Yellow, etc.
Size (required for apparel):
Actual size of product in XXS, XS, S, M, L, XL, XXL, etc.
Size type:
Regular, petite, plus, big and tall, maternity
Age Group:
newborn, infant, toddler, kids, adult
Size System:
US, UK, EU, DE, FR, JP, CN (China), IT, BR, MEX, AU
Custom Labels
Custom labels allow you to group products in ways that make sense to your business. This field is the bridge between Feed Optimization and Campaign Optimization.
In the Campaign Optimization section we’ll discuss how you can use custom labels to segment products in order to strategically set bids based on your business goals.
But first, let’s talk about implementing custom labels as attributes in your data feed.
You can have up to five custom labels in your product data feed. These start with 0 and end with 4. Assign a specific definition for each of the five custom labels and specify the possible values for each. Use these custom labels consistently across all products in your Merchant Center account, assigning the appropriate value to each product according to the custom label definition. Each of the five custom labels can only have one value per product.
The values for custom labels will vary based on your products and your business’ unique needs.
COMMON CUSTOM LABEL EXAMPLES
Use these examples to organize your campaigns or build your own using similar characteristics.
USE CASE:
Seasonality - For products that peak in popularity during select times of year custom_label_0: Winter, Spring, Summer, Fall
USE CASE:
Price - To separate products based on price ranges custom_label_1: Under10, Under50, Under100, 100_250custom_label_0: Winter, Spring, Summer, Fall
USE CASE:
Profit - To segment products based on sales margins custom_label_2: LowMargin, HighMargin
USE CASE:
Promotion - For discounted products custom_label_3: Clearance, OnSale, BlackFriday
USE CASE:
Performance - To highlight or de-emphasize products based on metrics custom_label_4: BestSeller, SlowSeller, HighClick, LowCPA
Google Shopping Campaign optimization
Unlike feed optimization, campaign optimization happens inside your Google Ads account, not your product data. And unlike feed optimization, which requires detailed management of product data, campaign optimization is more about using all of the tools and settings at your disposal to maximize your campaign’s efficacy.
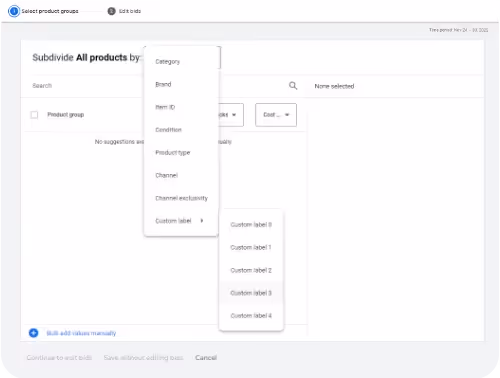
Segment Products with Custom Labels
The first and most important part of campaign optimization is the use of Custom Labels. Custom labels let you organize products into groups of bidding targets. These segments give you more flexibility in setting bids and allocating budget based on business goals.
Your products vary. By price, by margins, by inventory, by seasonality… And while these attributes might seem trivial on paper, they can help you create smarter campaigns (or hurt your campaigns if ignored).
Knowing how your products vary based on these attributes will allow you to segment the catalog you push to Google using custom labels. You can then use those custom labels to create optimized campaigns with bidding strategies tailored to each segment’s unique CPA.
We recommend a combination (or all) of these segmentations for new Google Shopping campaigns:
PRICE POINTS
This allows you to distribute bids so that you’re not bidding in the same range for a $10product as you would for a $100 product.
HIGH ROI
Products with bigger margins give you greater freedom in bidding — even for lower priced items.
SEASONALITY
Season-specific segments let you raise bids when items are in season and decrease bids (often significantly) when they are less likely to sell.
CLEARANCE ITEMS
Here you have two options:
- If your goal is to get rid of low-selling items as fast as possible, raise bids to increase the chance of potential customers seeing them.
- If your goal is to minimize COS on reduced-priced items, lower bids to maintain ROAS and the chances of potential customers seeing them.
BEST SELLERS
Product segments based on performance allow you to increase or decrease bids accordingly to get the best possible return on investment.
CATCH-ALL
This is a base campaign with all of your products. It is intended to catch any relevant product search queries that don’t match any of your other segments. This segment’s campaign priority should be set to low and the bid should be set to no more than a few cents.
Target Your Bids to Custom Labels
Bids play a key role in your PLAs’ position (ad placement in relation to competitors’ ads) and frequency (how often ads are served for qualified search queries). That’s why it is imperative that your bids strike a perfect balance between budget and impression share. Bid too high and you’ll overspend, bid too low and you’ll miss out on shoppers.
To toe this line, you’ll need to account for the following factors:
PRICE
Bids should take into account the product’s price. Put simply, a $10 pair of socks should not have the same bid as a $300 pair of shoes.
Use custom labels (Under10, Under50, etc.) to differentiate products and apply bids accordingly.
PROFIT
Knowing your margins will help you determine whether a higher bid makes sense on a product, regardless of its price. This is especially true with accessories, peripheral items and auxiliary devices whose margins are a higher percentage despite being priced lower than the products they support.
Use custom labels (LowMargin, HighMargin, etc.) to distinguish product groups based on profit margins.
PERFORMANCE
How a product performs should affect how you bid for that product’s PLA — regardless of its price and/or margins. Strong performers (low CPA) should be rewarded with higher bids while products whose CPAs are high should be demoted.
Use custom labels (BestSeller, LowSeller, etc.) to promote/demote products based on performance.
SEASONALITY
Products with seasonal sales cycles should be grouped so that bids can be levered up and down according to demand.
Use seasonal custom labels (ValentinesDay, SpringSkiing, SummerSurf) to increase bids for popular items during heavy traffic times or to clear out out-of-season products, you will ensure greater reach. Furthermore, you’ll be able to quickly increase and decrease bids across many products at once — both before season and after that season is over.
PROMOTIONS
Maybe you want to clear out sale items. Or maybe you don’t want to waste ad spend on clearance products.
Use promotional custom labels (Clearance, OnSale) to increase/decrease bids accordingly.
Boost & Suppress Individual Products
Just like search queries, you can see individual product performance in the “Dimensions” tab.
You can easily see which products are producing conversions at acceptable rates and which are not. For products that are performing well, bid higher. You can do this by going to the Google Shopping campaign they’re in and subdividing by item ID and setting a higher bid.
In this example, the specific item ID may get a $1 bid while the accessories product group may continue with a $0.85 bid. Recognizing that the specific product performs better, you are giving it more exposure with a higher bid.
Conversely, you can lower bids on products that aren’t performing or exclude all together. I’ve also created poor performers campaigns that house these ineffective products. The idea is that I’ll exclude these products in my regular Google Shopping campaigns and relegate them to a campaign with a much lower bid.
Identify Top Brands
You can also view performance by brand using the “Brand” report in the “Dimensions” tab. Just like individual products, you can see which brands perform better or worse. The goal is to subdivide your product group by the specific brand.
For example, if you are selling socks you may only want to bid on the Nike brand because it has the highest profit margin. You would then exclude everything else in that accessories product group. Thus, any “sock” related search would produce a PLA containing a Nike product.
Exclude Search Queries with Negative Keywords
Google Shopping doesn’t let you bid on target keywords. PLAs are triggered based on your product data’s proximity to a search query.
You can, however, use negative keywords to exclude your products from specific search queries. This is particularly useful for queries with high cost per conversions and low conversion rates.
To identify these “wasteful search queries,” go to the “Dimensions” tab under “View: Search terms” or in the “Keywords” tab by clicking “Details” and then “Search Term > All”.
Reviewing search queries directly within the “Keywords” tab lets exclude terms directly from this interface.
Once you have your negative target queries, set up a filter for poorly performing terms.
The filter can be set to your desired preference. First, I look at queries that haven’t converted but have seen at least 50 clicks over the last 30 to 90 days.
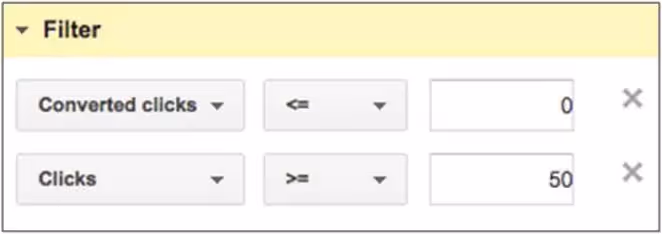
Based on these two examples, which search query would you add as a negative keyword?
- EXAMPLE 1: This search query has seen 100 clicks with 1 conversion at $120 cost per conversion.
- EXAMPLE 2: This search query has seen 300 clicks with 5 conversions at $70 cost per conversion.
Although both search queries could potentially benefit from negative keywords to better qualify clicks, the first example is a clear candidate for a negative keyword exclusion.
Determining when to exclude a query can be subjective so it’s important to analyze in conjunction with your account goals.
When excluding queries, you’ll also want to pay attention to your Search Funnels report. This report shows how your keywords and campaigns are working together to produce conversions.
For example, a click on a PLA might have been the first click, but the user left the site and then clicked a branded ad and ultimately converted. Unfortunately, you can’t see which query assisted, but you can see that a Google Shopping campaign helped.
Hack Your Budget
Google Shopping doesn’t let you bid on target keywords. PLAs are triggered based on your product data’s proximity to a search query.
You can, however, use negative keywords to exclude your products from specific search queries.
This is particularly useful for queries with high cost per conversions and low conversion rates.
To identify these “wasteful search queries,” go to the “Dimensions” tab under “View: Search terms” or in the “Keywords” tab by clicking “Details” and then “Search Term > All”.
EXAMPLE
Instead of allocating a $10 daily budget across 24 hours a day, 7 days a week, try:
- OPTION 1: $300 monthly budget | $10 a day | 7 days a week | 9 a.m. and 5 p.m.
- OPTION 1: $300 monthly budget | $25 a day | Friday, Saturday, Sunday | 24 hours a day
To do so, think about your target audience. Who are they? When do they shop?But don’t just guess. Look at your campaign’s historic performance by day and hour. Inspect your site’s analytics to find your audience’s preferred shopping days and times.
The Google Ads Ad Schedule tab is a great source of data, too. Not only is it where you would go to daypart your ads, it’s also where you can get actionable insights about your campaign’s day/ time performance.
Campaign scheduling is one of the most effective ways to maximize smaller budgets. Use it to establish target timeframes.
To do so, think about your target audience. Who are they? When do they shop?But don’t just guess. Look at your campaign’s historic performance by day and hour. Inspect your site’s analytics to find your audience’s preferred shopping days and times.
The Google Ads Ad Schedule tab is a great source of data, too. Not only is it where you would go to daypart your ads, it’s also where you can get actionable insights about your campaign’s day/time performance.
DAYPARTING NOTES:
- Ad schedules can only be set at the campaign level.
- Make sure you have enough historic campaign data before committing to a restrictive ad schedule. Allow for at least 60 to 90 days of impressions and clicks.
- Continue to review ad schedule performance at least once a month to determine whether to continue restricting schedule and to look for additional opportunities.
Amplifying Reach Across Google
Google Shopping is the main driver of business for many sellers. It’s so effective in this role, in fact, that for a long time there persisted a misguided sentiment that Google Shopping ads were all you needed to build a successful marketing strategy for ecommerce sites.
Of course, that’s not the case. A successful ecommerce strategy requires continual transformation to keep up with market demands.
Luckily, Google Shopping is the foundation for Google’s retail ecosystem, which stretches far and wide to over 2 million sites and reaches over 90% of people on the Internet.
And yet, far too many sellers are still not taking full advantage of everything Google has to offer.
This is especially short-sighted when you consider that, if Google Shopping is already set up, much of the hard work is done.
In this section, we explore the less popular (and less crowded) ways sellers can leverage Google for ecommerce.
Dynamic Remarketing
Just because you grab a shopper’s attention once doesn’t mean they’ll make their purchase right away. It may be that your shopper is only in the Awareness or Interest stage of their journey and needs more time before committing to a purchase. Maybe they’re just curious and need further education on the product. Or maybe they’re just not ready yet, whatever the reason.
This is why dynamic remarketing has become such a powerful tool. It allows you to show ads to shoppers who have already shown interest in your products. By appearing in front of them
multiple times, you remain relevant until they’re
finally ready to become a customer.
Dynamic remarketing can be an incredibly powerful tool but only if you understand how to correctly optimize your approach by doing the following:
BID ON THE SHOPPER’S POSITION IN THE FUNNEL
This goes back to understanding where in the buyer’s journey your shopper is. If someone has only visited your site once, they might not be interested in actually making a purchase anytime soon. On the other hand, if they recently abandoned a cart, that customer is worth a lot more.
RETARGET BASED ON DEMOGRAPHICS
Take the time to analyze your analytics and figure out which demographics represent your best customers. Then bid more to remarket to those shoppers. You might find that a certain demographic is so likely to buy that even when they’ve only visited your site once, it pays to put ads in front of them because they’ll probably make a purchase.
RETARGET BASED ON INTENT
Not every page or product on your site shows the same intent from shoppers. Use what you’ve learned from analytics to identify winners and losers. Then, in effort to focus more of your ad spend on products that yield better performance, you can retarget using custom labels and product groups.

Google Local Inventory Ads
“Your product near me.”
Imagine a search query so common that Google built a whole platform around it.
It turns out 80% of shoppers won’t visit a store if they can’t see inventory online first. So Google created Local Inventory Ads to let shoppers find the products they want at stores near them.
If you have a brick-and-mortar location, Local Inventory Ads can be your ticket to boosting local foot traffic.
Fortunately, implementing Local Inventory Ads is relatively simple. Here’s how:
- Enable local inventory ads in Merchant Center
- Create a primary feed (if you don’t already have a Google Shopping feed in Merchant Center)
- Create a local product inventory feed
- Register and submit local feeds
For more information on this topic, visit our Google Local Inventory Ads guide.
Buy on Google
Having “Google” on the label doesn’t hurt, but having Google Shopping as an ad delivery system is the real winning detail here.

So what exactly is Buy on Google?
Simply put, Buy on Google enables retailers to display their products on multiple Google platforms via Google Shopping product listing ads, the Google Shopping marketplace, the Google Shopping mobile app and the Google Assistant for mobile and Google Home devices.
Best of all, besides a few additional attributes, Buy on Google works mostly out of your existing Google Shopping product feed and Merchant Center account.

Surfaces Across Google
Google has started displaying products from Merchant Center in areas other than Shopping ads. At no cost to advertisers.
This is huge for sellers.
Surfaces Across Google places your product listings across the Web on Google Images, Google Search results and Google Lens. And despite the extra exposure from these added surfaces, Google isn’t charging merchants for this service. There’s a good reason for this.
For a while now, Google has been improving its search engine to better cater to shoppers.
When someone searches for “winter coats”, Google wants the search results to collect as many relevant results from as many retailers as possible, so everything the shopper needs to make a purchase is right in front of them.
From Google’s standpoint, this is also a great way to engage businesses that have held back on using Shopping and other paid options. In order to give shoppers the best possible experience, Google wants to incentivize these companies by letting them (you) leverage more of its retail platform at no cost. Win, win, win.
Shopping Ads Reporting
Honestly... Do you know if your campaign is successful?
The truth is, a lot of sellers just don’t know. Maybe that’s because they don’t know what to look for to measure success. Maybe they don’t know how to implement the tracking mechanisms needed for accurate and informative reporting. Either way, we’re going to tackle this issue here.
Much of basic insights into the performance of your Google Shopping campaigns can be viewed in your Google Ads dashboard. As with other campaign types, you can see the total impressions, clicks, and conversions attributed to Shopping campaigns, ad groups, and ads.
Performance of product groups
See and compare how each product group is performing. Note that a parent product group rolls up (summarizes) performance data from all of its children. That is, performance data is broken out for each individual child product group as well as summarized at the parent level.
Performance of specific products advertised in the campaign
See performance data for individual products or groups of products organized by product attributes in your inventory feed. For example, see and compare how different brands of products are performing.
Available performance metrics
The types of performance data you can see inside Google Ads depend on the item you’re reporting on:
Campaign, ad groups, ads
- Engine metrics (such as clicks, impressions, cost)
- Floodlight conversions (such as Actions and Transactions)
- Google Analytics metrics
- Google Ads conversions
Product groups
- Engine metrics (such as clicks, impressions, cost)
- Floodlight conversions (such as Actions and Transactions)
- Google Ads conversions
- Google Analytics conversions
- Non-conversion data (such as Google Analytics sessions and page views) is not available for product groups.
Specific products advertised in the campaign
- Engine metrics (such as clicks, impressions, cost)
- Floodlight conversions (such as Actions and Transactions)
- Google Analytics metrics
- Google Ads conversions
Understanding the Google Ads reporting dashboard is an important first step toward gaining campaign performance clarity. But what if you want to compare how your Google Shopping ads are doing versus other marketing campaigns like email marketing, social media or SEO?
For that, you’ll have to go beyond Google Ads’ native reporting, and enter the world of Google Analytics and UTM tracking.
Tracking Success with UTM Parameters
UTM stands for Urchin Tracking Module (UTM). Don’t worry about the weird name, though, it’s a vestige from Google’s olden days.
All you really need to know is that UTMs are URL parameters supported by Google Analytics for marketing campaign attribution. These URL appendages help Analytics identify, sort and organize incoming traffic by campaign, source, medium, term and content.
UTM Parameter Structure
It’s important to note that UTM structure has 5 accepted values for its parameters:
UTM_SOURCE
- Value: Traffic source or referrer
- Examples: ?utm_source=google+shopping OR ?utm_source=facebook+dynamic+product+ads OR ?utm_source=bing+text+ads
- Function: Used to identify the website or app that sent directed the visit to your site
UTM_MEDIUM
- Value: Campaign medium or marketing medium
- Examples: ?utm_medium=cpc OR ?utm_medium=social OR ?utm_medium=email
- Function: Used to categorize visits into types of traffic
UTM_CAMPAIGN
- Value: Campaign name, product group or promotion
- Examples: ?utm_campaign=spring_sale, ?utm_campaign=top_performers, ?utm_campaign=clearance
- Function: Used to identify internal marketing campaign names
UTM_TERM
- Value: Search terms or keywords
- Examples: ?utm_term=running shoes OR ?utm_term=yoga mat OR ?utm_term=snow boots
- Function: Used mostly in non-shopping campaigns to identify targeted keywords
UTM_CONTENT
- Value: Unique content of the ad
- Examples: ?utm_content=Nike+Air+Max+97 OR ?utm_content=US780US780 OR ?utm_content=banner_300x250
- Function: Used to differentiate ads by content such as product title, ad dimensions or ad headline
Notes on UTM usage:
- UTM strings begin with a question mark (?). This separates the string from the base URL. Use only one ? per UTM.
- UTM paramaters are separated by an ampersand (&). Use an & between parameters.
- UTM parameters values are designated by an equals sign (=). Use an = before every value.
Here’s an example of a finished URL with a finished UTM parameter string appended to it:

Key Performance Indicators
UTM tracking can also give you insight into optimization. This can be a useful tool when you’re trying to identify trends in your space. Knowing what combination of campaigns, placements and schedules are driving (or not driving) traffic to your store will help you better target audiences and fine tune ad text for improved performance.
To help you understand these metrics, we’ve put together an index of KPIs with formulas and tips specifically for shopping campaigns. Use this index to identify the KPIs that are important to your business.
CONVERSION RATE
Conversion rates can be a simple yet powerful metric for online retailers. It can tell you how effective your ecommerce campaigns, landing pages and even messaging are.
FORMULA: CONVERSIONS / CLICKS
AVERAGE ORDER VALUE
Average Order Value (AOV) can be one of the most telling metrics when measuring profitability of a sales channel. It can even tell you which products are the biggest drivers of revenue. AOV is especially important to determine the profitability of your shopping channel campaigns.
Take the total amount of revenue divided by number of orders during the same period. It can be cut up by channel, brand, sku, etc.
FORMULA: AVERAGE ORDER VALUE = TOTAL REVENUE / NUMBER OF ORDERS TAKEN
COST
Successful retailers know the secret is not just in selling. It’s in selling profitably. And the first guard against unprofitable selling is managing your cost.
For online retailers, this often comes down to measuring costs accrued by individual verticals (i.e., sales channels, brands and even SKUs).
FORMULA: AVERAGE ORDER VALUE = TOTAL REVENUE / NUMBER OF ORDERS TAKEN
COST-OF-SALE PERCENTAGE
Cost-of-Sale Percentage (COS%) is the actual total cost of converting an item relative to the revenue it generated. For example, if one item with a $100 price tag sold and took $15 in click costs to convert, the COS% for that item at that point is 15%.
Unfortunately, you have to have a sale first in order to get this value. So what happens when a product has not sold yet? Enter the Estimated Cost of Sale.
FORMULA: COS% = CLICK COSTS FOR PRODUCT / PRODUCT REVENUE
COST PER ORDER/COST PER ACQUISITION
Cost per Acquisition (CPA) tells you how much you’re spending on average to achieve a sale. Say your monthly ad spend on Google Shopping is $5,000 and with that you’ve acquired 202 sales. Your CPA then would be $24.75. It’s important to measure CPA in relation to AOV per individual channel to determine profitability.
You can do this manually using Excel or, better yet, use your feed management software’s analytics tools to create CPA and AOV reports by channel to identify which drive better orders.
FORMULA: AD SPEND / ORDERS
RETURN ON AD SPEND
Return on Ad Spend (ROAS) tells you how much revenue your campaigns are generating in relation to how much you’ve spent on advertising. In other words, for every dollar invested in advertising, how much money did you get back in revenue?
If your feed management software offers cost reporting, you can cutup by ROAS by channel and by SKU to identify which channels and products are your big sellers and which are just costing you money.
FORMULA: CONVERSION VALUE / COST
Understanding your store’s KPIs will help you produce high-quality campaigns, but more importantly, it will help you calibrate for performance along the way.
But what if your Google Shopping campaigns are not delivering on their potential? What if the impressions and clicks and conversions aren’t there?What if you suspect there’s something wrong with your PLAs?
Let’s talk about troubleshooting your campaigns.
What to do when errors disrupt operations
Google Shopping represents a major opportunity for your company.
That’s why it’s so frustrating when, no matter how much TLC you put in, your products just don’t show up in Google. Worse yet, the longer this problem persists, the longer your competitors enjoy Google Shopping without you.
It should go without saying that you must address this problem right away.
We’ve even broken the reasons your shopping ads aren’t showing on Google into three categories:
TROUBLESHOOTING YOUR PRODUCT FEED
This section is about your product data and how Merchant Center sees it.
TROUBLESHOOTING YOUR GOOGLE ADS
Here we’ll look at account-related issues.
TROUBLESHOOTING YOUR SHOPPING ADS CAMPAIGN
Finally, we’ll look at Google Shopping campaign configurations that could be preventing your ads from showing.
Now let’s dive in and get your Google Shopping ads finally showing up in searches.
Product Feed Issues
1. Google’s Rules and Policies
Before you look into any other potential problems, make sure that you’re following Google’s rules and policies first. You could make all kinds of changes and still not see your products if you’re unknowingly violating them.
Keep in mind that Google Shopping’s policies apply to:
- Titles
- Images
- Descriptions
- Availability
And just about anything else that will be linked to your campaign. Basically, any information Google requests – or allows you to provide – must adhere to specific rules. Even getting it wrong for one factor out of dozens will keep shoppers from seeing your product.
The good news is that Google will usually alert you if this kind of problem exists. You just need to check your email, account, and dashboard – all three places this message could be sent.
2. Products Listed for Country Other Than Your Own
First, check Google’s availability by country to ensure you’re not currently in one where your listings wouldn’t show.
Second, if you’ve designed your listing so it targets a certain country – say, France – but you’re in a different one – the U.S. – you simply won’t see it. That doesn’t mean anything is wrong with your feed.
At the same time, if you’re in the U.S. and you aren’t seeing items you targeted at the U.S., the problem might be that you made a mistake and are erroneously targeting foreign markets. You’ll want to change that right away before someone from overseas places an order that you’ll need to fulfill.
3. Account or Inventory Needs Review
It can take between 24 and 72 hours before Google is able to review your product feed. So, while it’s still worth reviewing the other items on this list, it might be that you just need to wait another day or two.
One way you can check to see if Google has reviewed your feed is to check your log-files to see if they’ve been crawled yet.
If you’ve waited more than a few days for approval, there could be a problem, so you should contact Google right away.
4. Data Feed Errors or Product Policy Violations
Another place Google will let you know if errors are affecting your feed is in your Google Merchant’s diagnostics tab. Just go to Products > Diagnostics to check.
Similarly, there could be crawling problems causing the issue. You can check for that by going to Products > Feeds.
Aside from the fact that your products won’t be listed until you fix these errors, your account could be suspended if they’re not addressed in a timely manner. So, act immediately!
5. Variants Missing
Many of the opportunities you have to provide information through your feed involve the option of using variants. For example, if you’re selling a clothing item, you may want variants of the title based on colors or sizes.
If you elect to utilize this option, but then leave any of the relevant fields blank, Google won’t show
your product until you complete them.
6. Other Listings Causing Problems
While you can list your products across multiple platforms, you cannot submit your product to Google Shopping through one of them (e.g. Amazon, Etsy, eBay, etc.)
The workaround for this problem is to create a multi-client account, so you’re able to sell on different platforms and still run campaigns.
7. Image Quality
You should never advertise your products on Google Shopping until you have amazing images to go with them.
In fact, Google won’t even list your product if the accompanying image isn’t at least 250 pixels in both height and width – 800 is a much safer choice.
Google Ads Issues
8. Google Merchant and Google Ads Not Connected
You might find that the problem is nothing more complicated than the fact that your Google Merchant account isn’t linked to your AdWords account.
If you use the same email address for both accounts, just go to “Account linking” to fix this problem. If they’re not the same, find the blue “+” in your Merchant account. Click on it, enter your AdWords account number, and you’ll be linked.
9. Bidding Spikes
Another problem could be the amount you’re bidding for a specific query. Google provides you with a Benchmark Max CPC to give you a rough idea of what other companies are paying per click for the same amount of traffic.
It’s not uncommon for companies to bid far below the Benchmark, knowing that they won’t have the same opportunity for impressions, but they’ll also save money.
For example, say that number is $2.50, but you decide to bid only $1.00. What you don’t see
is that other companies are trying the same strategy, only they’re bidding $1.05 or $1.10. So, you’re effectively being shut out because your bids are adequate, but only before the competition starts to heat up.
Try increasing it incrementally to see if that solves the problem.
10. Billing Information
This should probably be #1 on the list. If your shopping ads aren’t showing up on Google, there’s a very good chance it has something to do with Google’s ability to charge your account. You might save a lot of time by looking at billing before jumping into digital detective mode.
Make sure that you have a working credit card on file. And that your billing details match. And that there is nothing preventing Google from charging you.
Campaign Issues
11. Campaign Not Yet Created
Check your AdWords account and confirm a campaign exists with the product in question as its label. If you don’t see one, this is a very easy fix. Just create a campaign for your product.
12. Bids Not High Enough
This is similar to the second AdWords problem above. While it’s wise to begin small with your bids, if your campaigns aren’t seeing any impressions at all – and none of the earlier issues apply – it’s almost certainly because your bids are far too low.
13. Titles and Descriptions Don’t Match Search Query
Are you searching for terms that don’t show up in your product’s title and/or description?
Google will only display ads for searches that either match or are at least relevant to titles provided in the feed.
14. Quality Score
Google keeps an internal Quality Score for each product submitted to their Shopping platform. This ensures that the only display items that are relevant to their users’ searches – which includes a certain degree of quality (i.e. no one wants to purchase a low-quality product).
If your Quality Score for a product is low, it could be that you changed its ID recently. In that case, you need to wait until Google recognizes the listing’s quality again. This is why you should keep IDs consistent as much as possible. Google uses them to track your items’ Quality Scores over time.
If the landing page for your product is low-quality (e.g. it doesn’t load quickly, its bounce rate is high, word count and keyword relevance are too low, etc.), your exposure will suffer.
Finally, check to see if you can add more information to your product description. The more information you provide, the more helpful you’ll be to Google’s users, which will definitely improve your Quality Score.
15. Negative Keywords
Negative keywords are great. They can save your campaign tons of wasted ad spend and prevent ads from showing up for the wrong search queries. Unfortunately, they can also prevent your ads from showing up in the correct search queries too, if you’re not careful.
If your shopping ads are not showing up for your desired search terms, take a good look at your negative keyword list. Make sure you didn’t accidentally add a negative keyword contains your search terms or overlaps your search terms.
16. Bids Exceed Daily Budget
Google Ads makes ecommerce advertising attainable for everyone. Even for sellers with small budgets. But there’s a caveat: Bids align with your budget so that there’s room enough for Google to show your ads — and shoppers to click on them — without exhausting your budget too quickly.
If your bid-to-budget ratio is too high, Google Ads might determine it can’t show your ads. Try lowering your bids first. If that still doesn’t help, try increasing your daily budget. If raising daily budget is an issue, look into applying one of our budget hacks here.
17. Ad Scheduling
Speaking of budget hacks, one of our favorites is tweaking the ad schedule to maximize your budget. How you do this is, you pool the weekly budget into concentrated time frames, i.e., $10 a day but only within the hours of 9 a.m. and 5 p.m. (instead of $10 from 12 a.m. to 11:59 p.m.), or $70 a week but only Friday through Sunday so that each day gets $23 a day instead of $10.
Ad scheduling is a great way to get the most out of limited budgets. It’s also a common cause of ads not showing up — either by design, or by mistake.
If your ads are not showing up, look at your ad schedule. Maybe it just so happens that you’re searching on a day or time that your ads aren’t scheduled for. Or ads might have been scheduled incorrectly so that they are only available to show on wrong days or hours.
18. Location Targeting
Google Ads location targeting is a great way to geo-target your shopping ads to the perfect audience. Location targeting lets you focus campaigns on the areas where your customers are, and restrict them everywhere else. Location targeting is a great way to optimize for ROI.
But what if you’re targeting the wrong location entirely (again, by design or by mistake)? Are you including the correct country? State? City? Zip?
What about exclusions? Could there have been a mix-up in placing inclusions and exclusions? Could they be flipped?
If your shopping ads aren’t showing up in Google searches, take a look at your location targeting.
19. Audience
Google Ads lets you target and observe specific audiences in shopping campaigns.
Audience observations are a great way to learn about your shoppers. This lets you see reports on shopper criteria without narrowing your targeting for that criteria — and even gives you the option to adjust bids for that criteria.
On the other hand, audience targeting restricts who your ads are shown to. If you use the audiences feature in your Google Shopping campaign and set it to targeting, you might severely limit campaign reach.
Audience targeting should be used only in secondary campaigns — like retargeting and not your main campaign. And certainly not on all of your campaigns.
If your Google Shopping campaigns are struggling to find impressions, take a look at your audience targeting. Make sure you’re not limiting your campaign reach by targeting too narrowly.