People abandon their virtual shopping carts all the time, and it’s your job as an ecommerce store owner to bring them back to recover their order.
Generally speaking, the best method is to remind them about your awesome products with retargeting. It also happens to be the most effective way to drive sales on Facebook and Instagram.
When you combine Dynamic Product Ads with your retargeting, your ads will show shoppers the exact products they already viewed, making them more likely to finish their order.
What Are Dynamic Product Ads?
Similar to ads generated by Google Dynamic Remarketing across the Google Display Network, Facebook and Instagram Dynamic Product ads are tailored product ads that follow prospective customers around Facebook and Instagram.
For example, say you are shopping for a red shirt.
Like many online shoppers, you get to the page, add the shirt to your cart, and then abandon it.
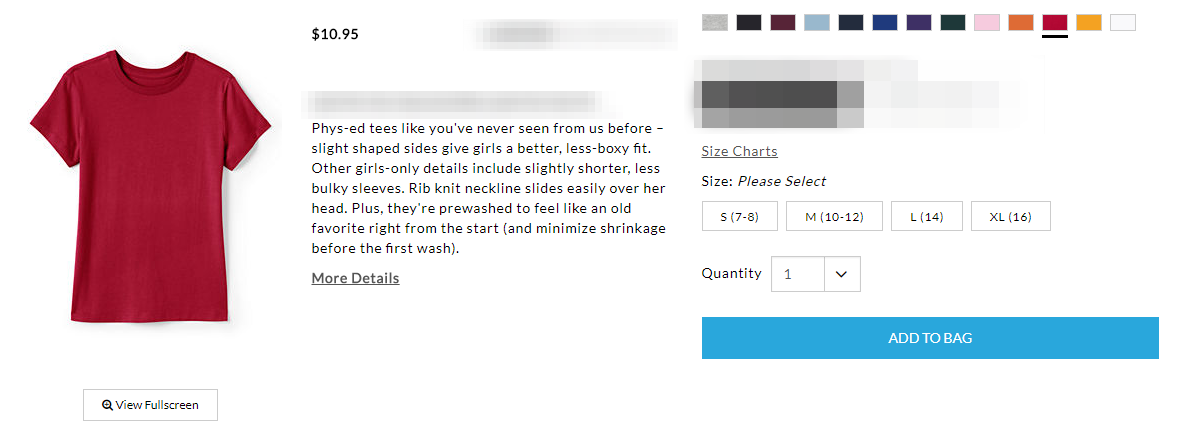
Two hours later, you log into Facebook and start scrolling through your News Feed... Then there it is, the exact same red shirt from before!
This is the power of Dynamic Product Ads. They automatically show your customers the products they are most interested in.
Facebook's Data and Targeting Advantage
When it comes to audience information, Facebook has an abundance of user data. With this wealth of insight, advertisers can target consumer interests, behavior, and more.
Because of this, Facebook dynamic product ads offer highly-refined targeting capabilities.
For example, a jeans retailer could target shoppers based on site behavior and demographic information combined. An ad campaign for the launch of a new line of jeans for younger buyers could target an audience based only on visitors that fit a specific age demographic and those that visit product and landing pages that promote the new jeans.
Dynamic Product Ads vs. Regular Facebook Ads
Dynamic Product Ads are proven to be more effective than traditional, static Facebook ads for E-commerce stores.
Studies show customers are more likely to buy if they see the exact same product they abandoned on the website. Facebook and Instagram take retargeting to a new level because of their extensive consumer data and advanced targeting capabilities.
Shoppers spend a lot of time on various social media platforms, generating plentiful ad space along the way.
Clothing company, Franne Golde, saw a "9x increase in return on ad spend during the holidays using DPA compared to previous retargeting efforts without DPA," according to Facebook.
How to Set up Dynamic Product Ads
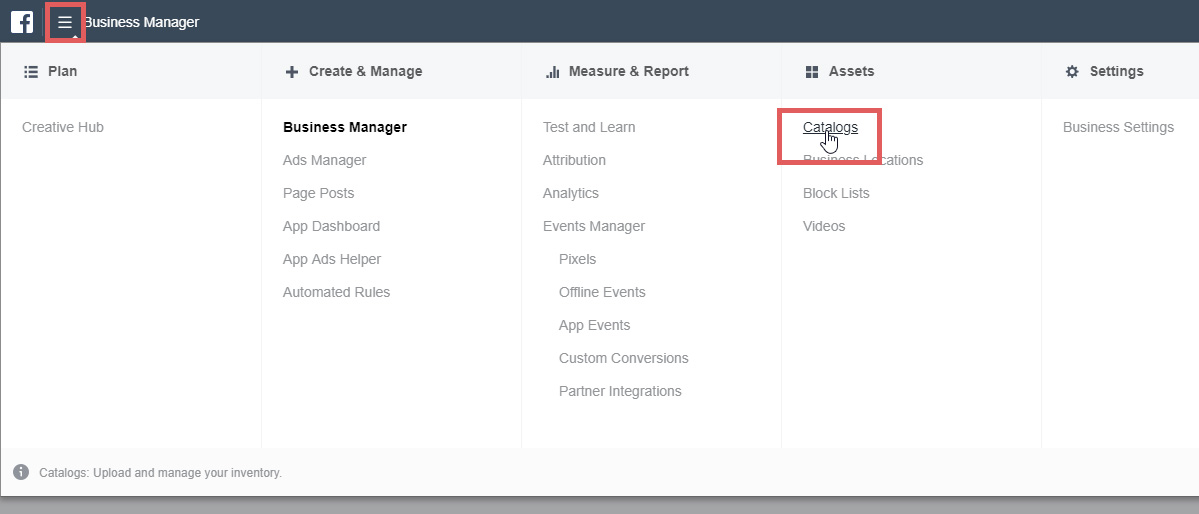
First, log in to your Facebook Business Manager account at business.facebook.com.
If you don’t have a Business Manager account yet, Facebook will walk you through the simple process of creating one.
Then, it’s time to get started.
Step 1. Upload your product catalog
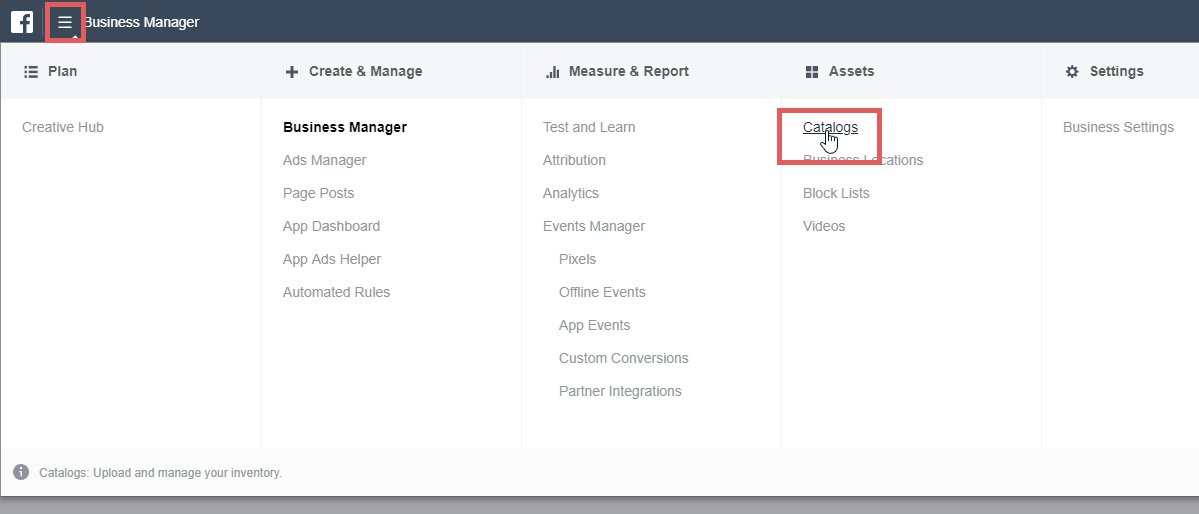
Once inside, click on the hamburger menu on the top left of the page. Then, click on the "Catalogs" link found in the Assets section.
This is the catalog manager.
Go to the far right of the page and click “Create Catalog.”

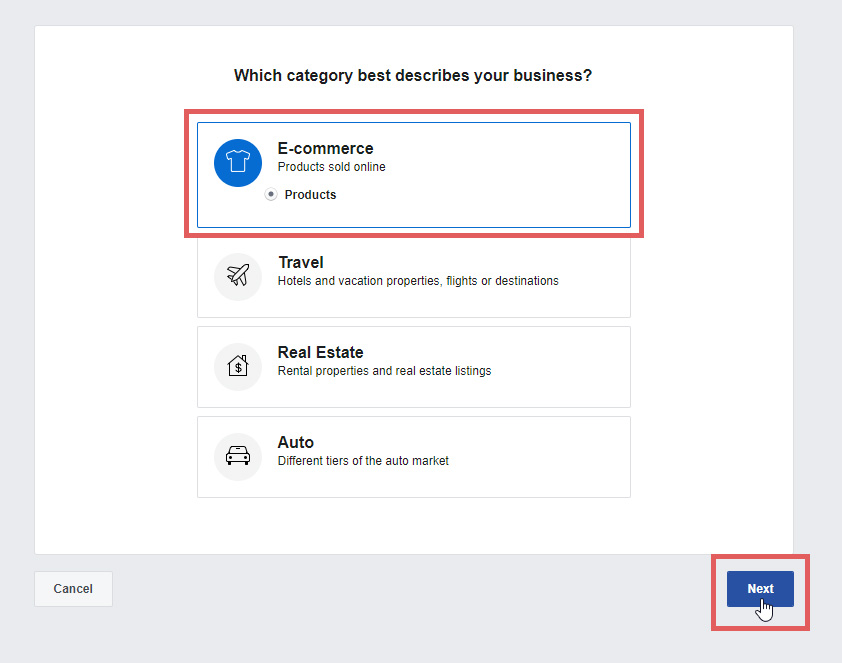
On the next page you'll choose your catalog type. You have four options.
- E-commerce
- Travel
- Real Estate
- Auto
For simplicity's sake (and because you're probably here for ecommerce DPAs), go ahead and select the "E-commerce" option.
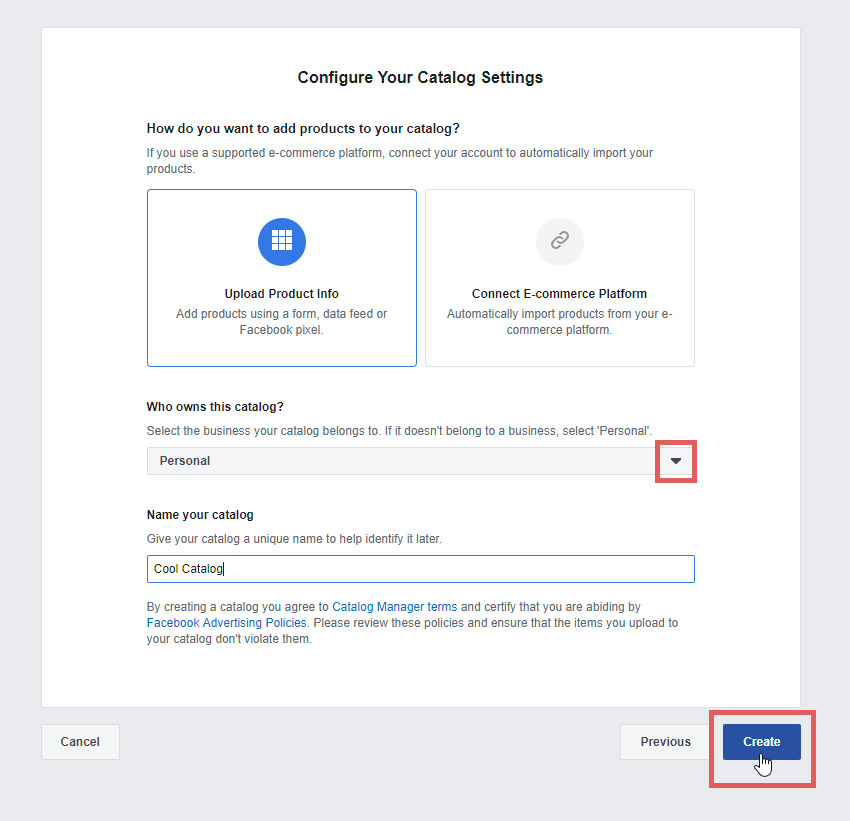
On this screen you'll create your catalog.
Here you can choose to upload your products using a form, data feed or Facebook Pixel, or you can automatically import products from your ecommerce platform. To demonstrate the manual route, we'll go with the first option.
Click the drop down menu and choose the business you want your catalog to belong to. Then, give your catalog a name to help you identify it later (only you will see this name).
Click "Create" once you're ready to move on.
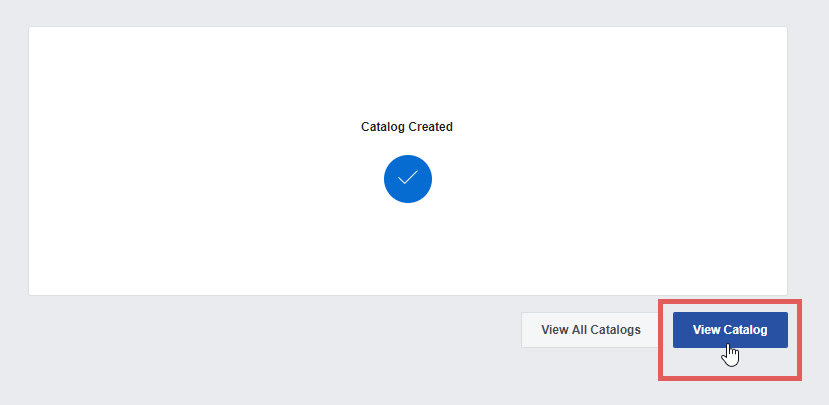
Congratulations, you've created your catalog! On to the next step—uploading your products!
Click the “View Catalog” button on the bottom right.
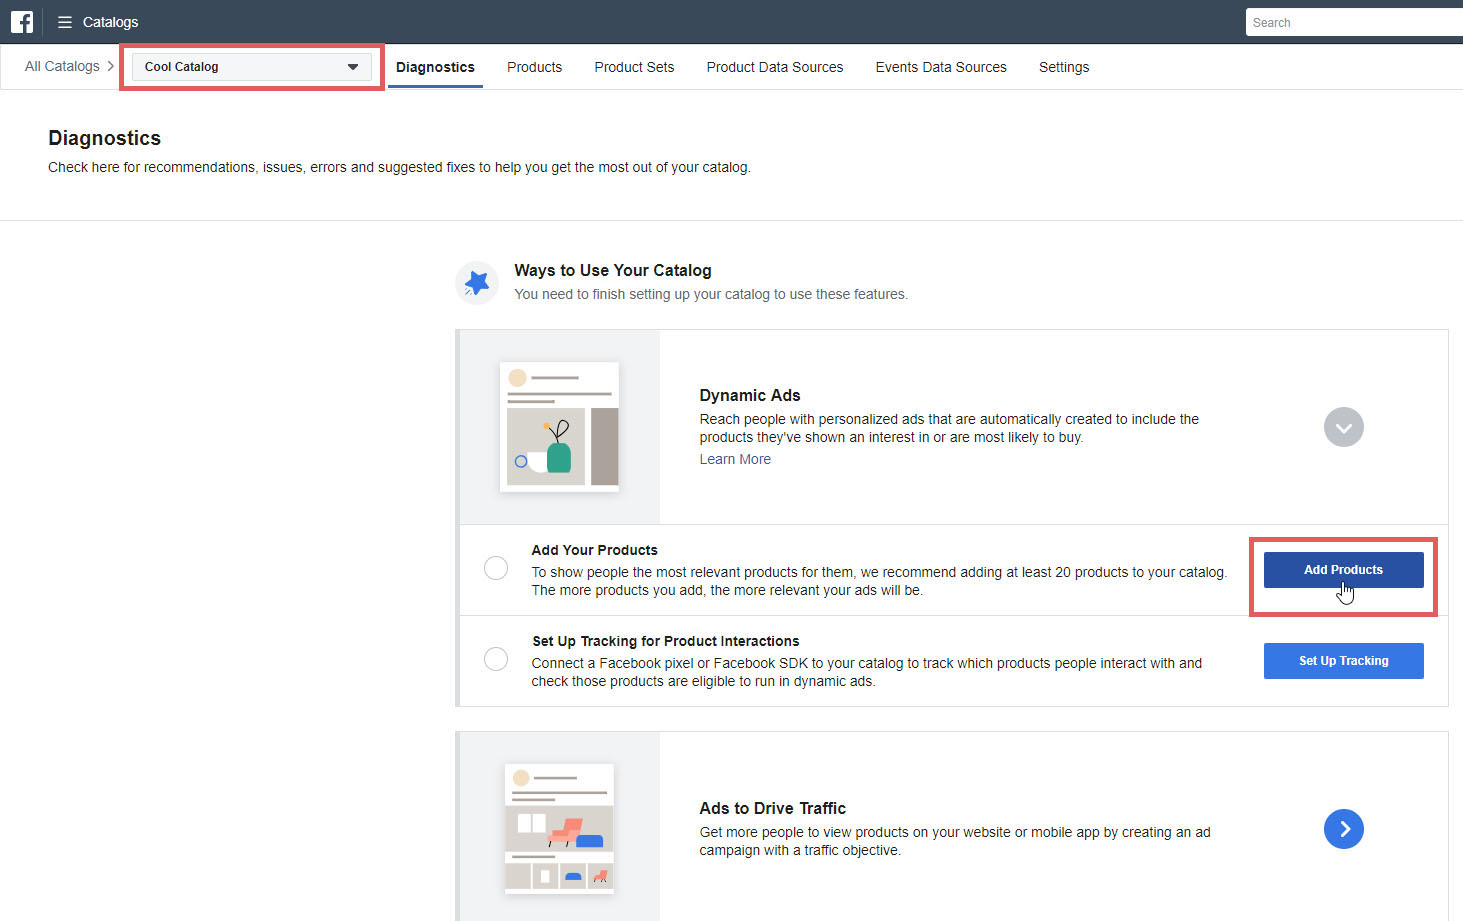
Here is where you'll add products (and later link your pixel).
You should see your catalog name in the top left drop down menu. Verify that you're in the right catalog and then click the "Add Products" button on the right.
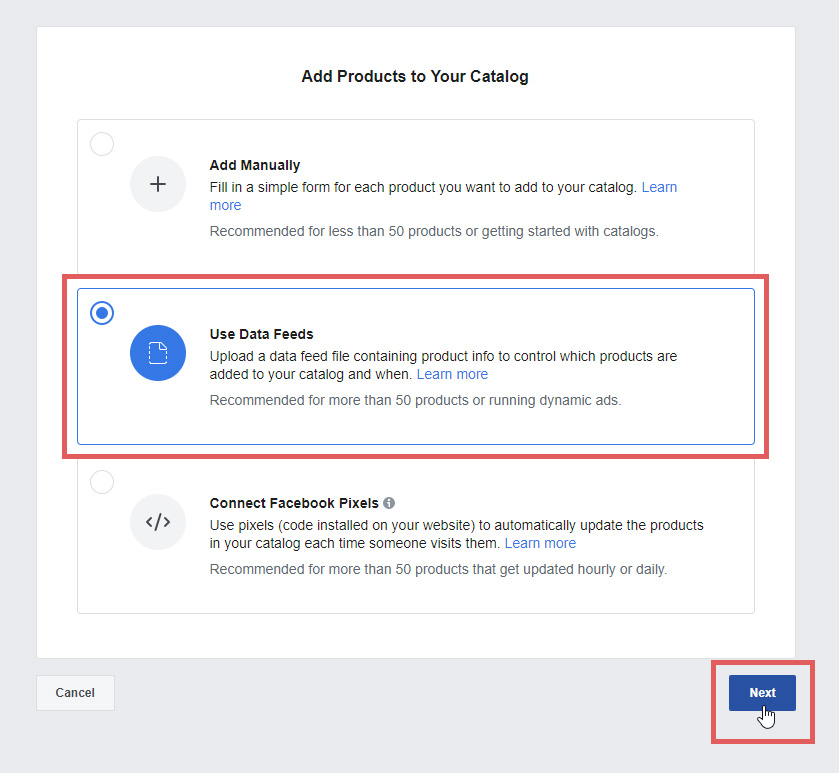
Most of the time you'll use a data feed or pixel. For our example here, we'll be using a data feed.
Select “Use Data Feeds,” then click “Next.”
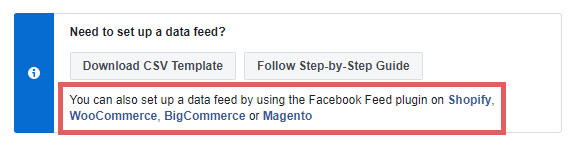
It's time to set up the data feed.
This is simple if you are using Shopify, WooCommerce, BigCommerce or Magento, as they all have Facebook Feed Plugins.
Click on the blue links and Facebook will give you exact instructions for your platform.
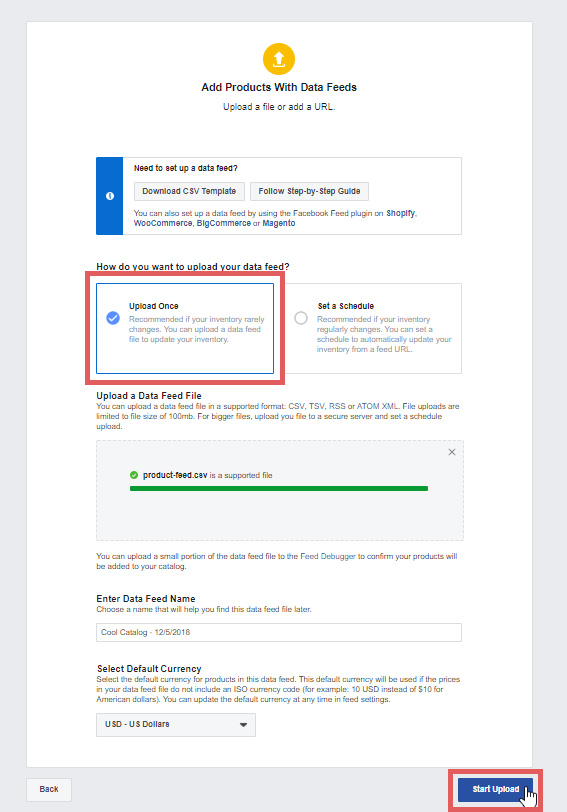
If so, select that option and then select your data feed file. The data feed name will automatically include the catalog name and date of upload—If you'd like to name it differently, you can easily do so on this page.
Verify your default currency and then initiate the upload.
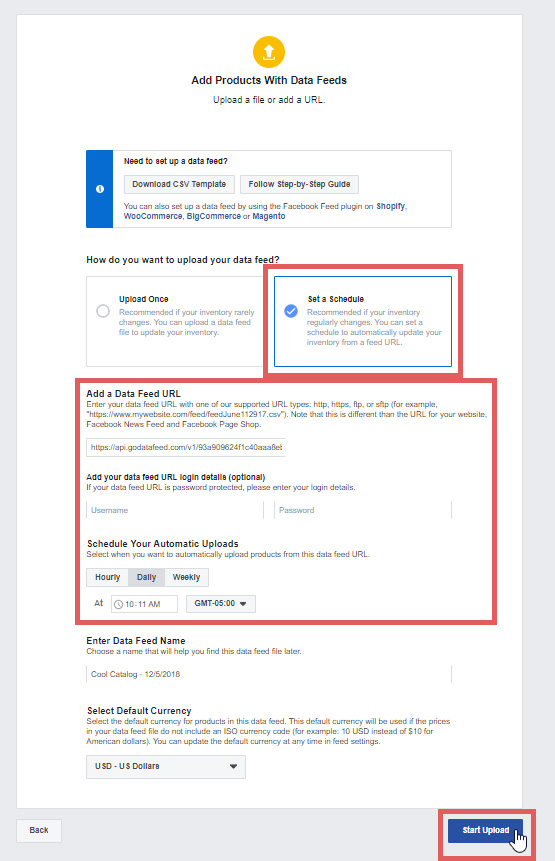
Otherwise, if your inventory regularly changes and you'd rather automate the process, you'll want to set a schedule.
Select the "Set a Schedule" option, add your data feed URL (and login details if applicable), and set a schedule that works with you.
The data feed name will automatically include the catalog name and date of upload—If you'd like to name it differently, you can easily do so on this page.
Verify your default currency and then initiate the upload.
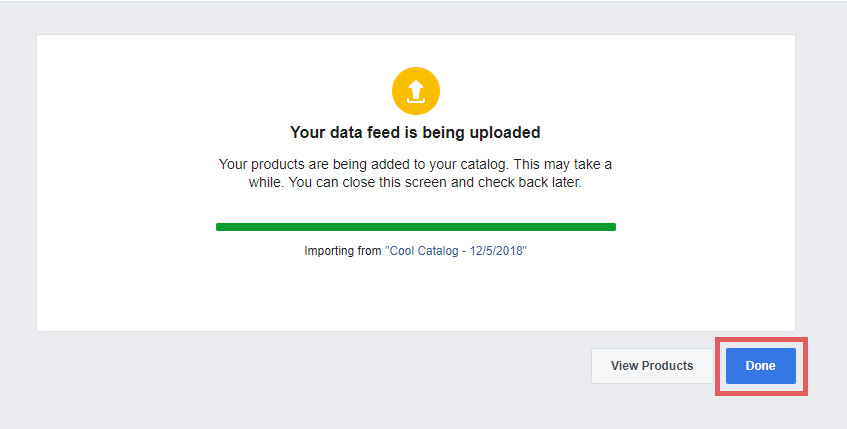
After you've initiated the upload, you should get to a screen like this. You don't have to wait around for your products to finish uploading. Click "Done" to proceed.
2. Setup your Facebook Pixel
Now it’s time to setup and/or link your Facebook Pixel.
Click on the hamburger menu at the top left of the page and navigate to "Pixels" found under the Measure & Report section.
Each ad account has a unique pixel so you might have more than one. Find the correct pixel for your website and select it.
If you don't have one yet, creating one couldn't be easier.
Follow the on-screen prompts when creating one. We'll use this test Pixel as an example.
Facebook has made Pixel setup simple.
You can manually install the code yourself, email instructions to a developer, or use a relevant partner integration or tag manager.
We'll be using Google Tag Manager, so click "Use an integration or Tag Manager."
On this page you'll choose a partner.
As previously mentioned, we'll be using Google Tag Manager. GTM integrates well with all sites, but you may already have another partner in mind.
By setting up your pixel using the an integration, Facebook will set up automatic events.
This is great because, before these integrations, you had to manually add events to the pixel. This greatly simplifies the process.
Click “Continue” to proceed.
This next bit is very linear. Follow the on-screen prompts to connect your pixel to your partner of choice.
We recommend downloading the Facebook Pixel Helper to make sure your pixel is live on your site.
Once your Pixel is live, you can go back to the Catalogs section of your Business Manager to link it to your catalog (although you'd be prompted to connect it later if you don't do this).
Once there, make sure you're on the appropriate catalog and click "Set Up Tracking."
Choose the relevant Pixel and click "Done."
Woohoooo, now off to the fun part!
3. Create your Dynamic Product Ad
It's time to create your ad.
Navigate through the hamburger menu again and select "Ads Manager" under the Create & Manage section.
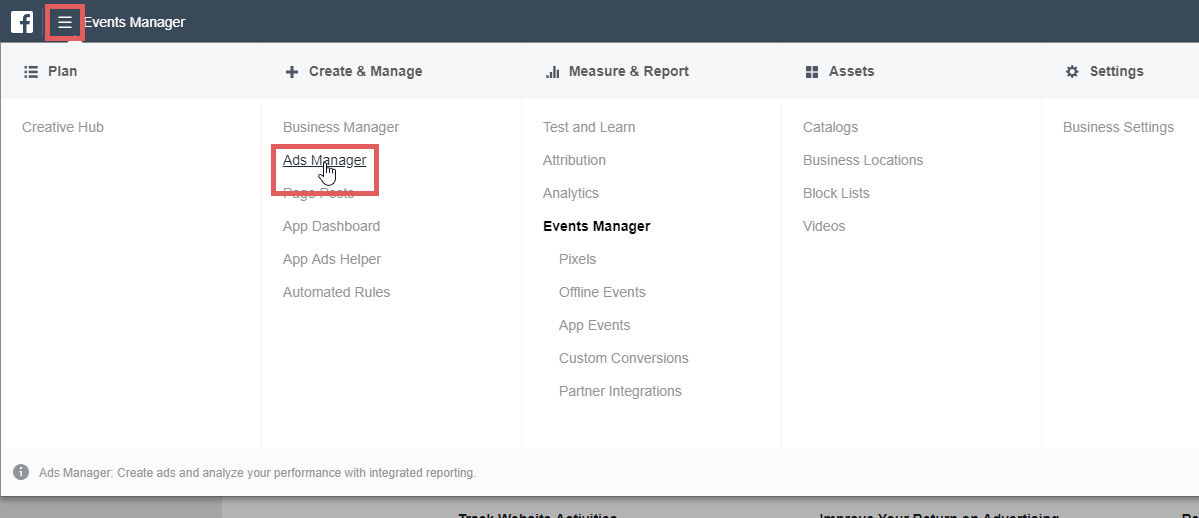
Welcome to Ads Manager, where all the magic happens.
You will see a green "Create" button, click it.

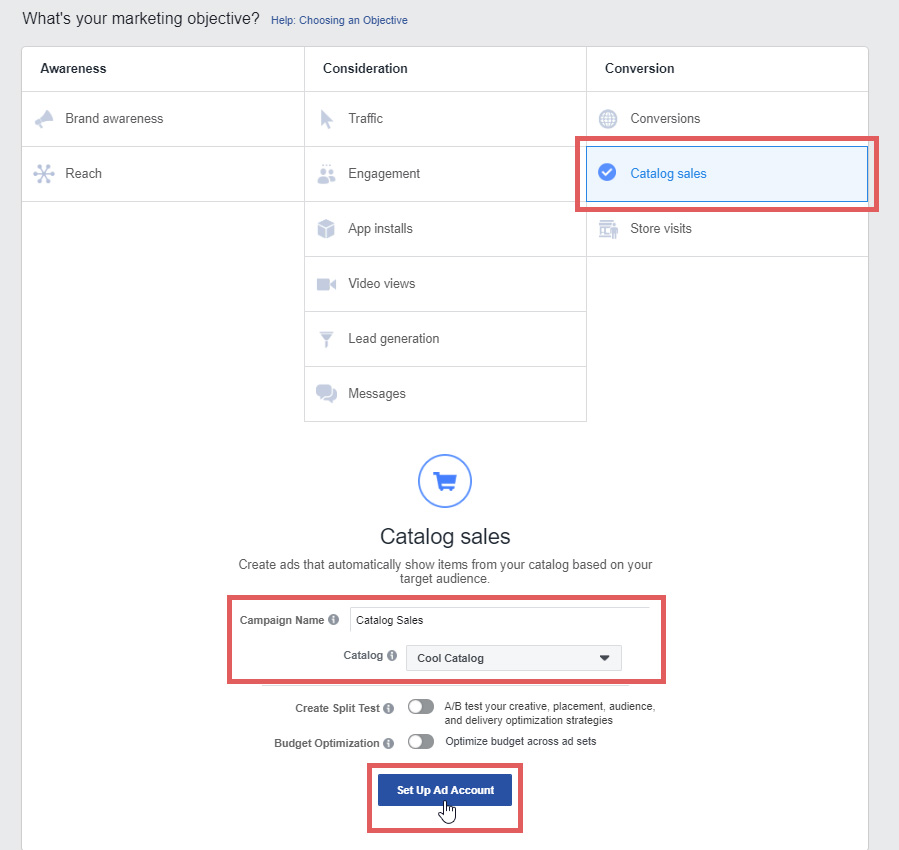
This is where you'll choose your campaign marketing objective.
We are creating Dynamic Product Ads, so click on "Catalog Sales" under the Conversion section on the right.
Name your campaign, choose your catalog, and then click "Set Up Ad Account."
If you already have an ad account set up and you've connected your page, you can skip ahead a couple steps.
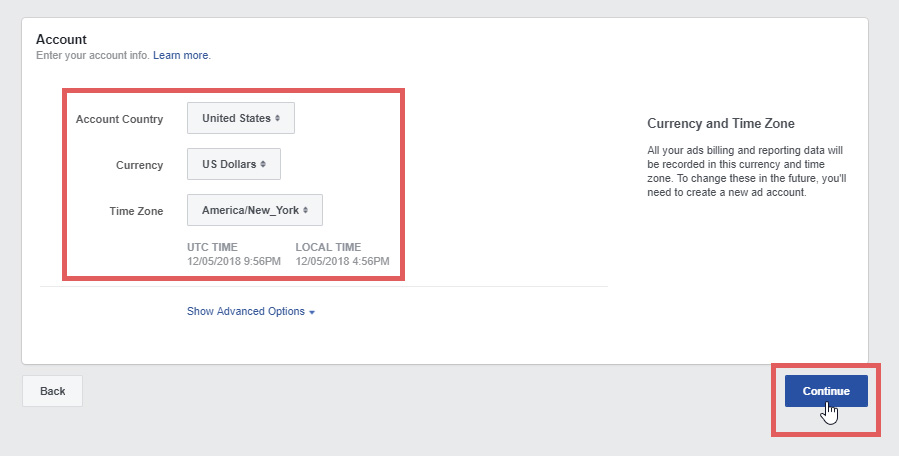
On the account setup page, choose your country, currency, and time zone.
Click "Continue" to proceed.
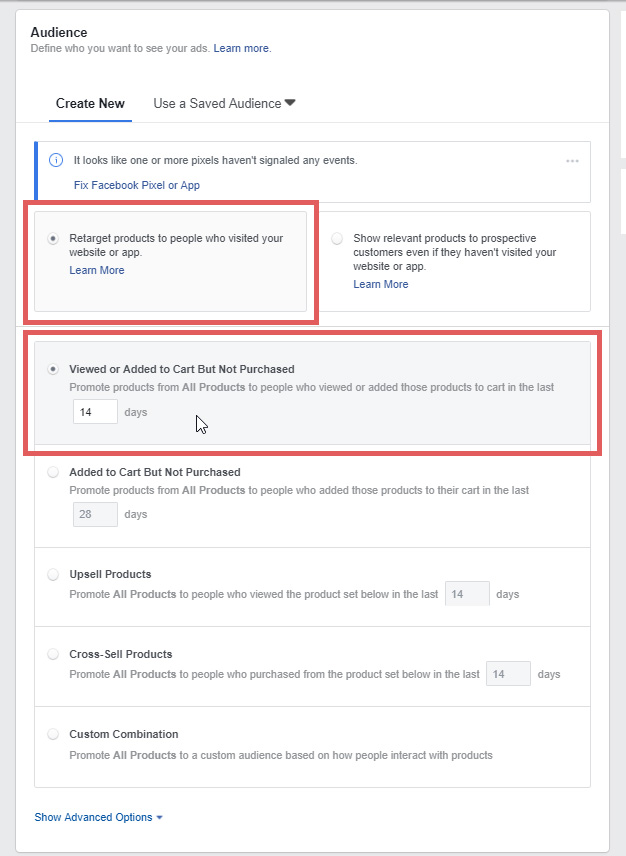
Now it's time to define your audience. This is where you tell Facebook who you want to see your ads.
Select “Retarget products to people who visited your website or app.”
Facebook gives you 5 default options:
- Viewed or Added to Cart But Not Purchased
- Added to Cart But Not Purchased
- Upsell Products
- Cross-Sell Products
- Custom Combination
We'll be using “Viewed or Added to Cart But Not Purchased,” so select that. By default this will have a cap of 14 days—tweak that accordingly (we'll go with that cap for this example).
This means anyone that viewed your products, or added them to their cart but didn’t purchase, will get Facebook ads of those exact products for that specified amount of time (14 days in this case).
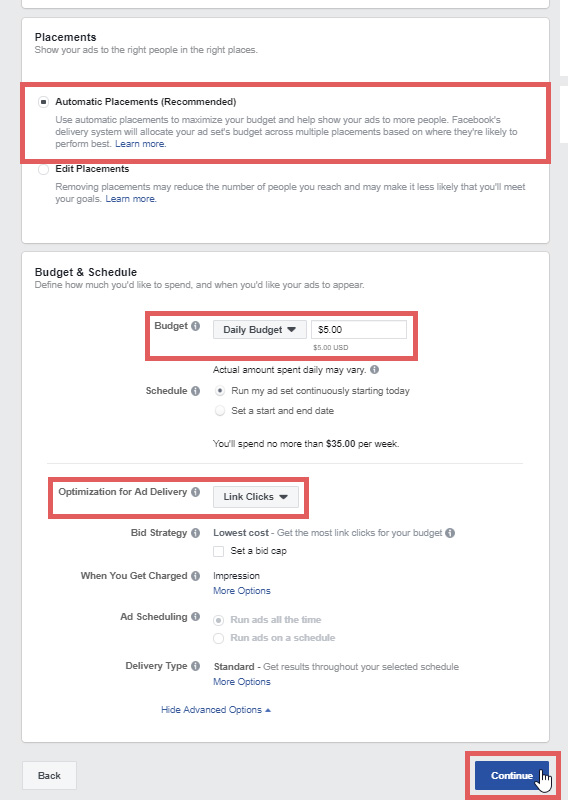
Now, it’s time to set up your placements and budget.
We (and Facebook) recommend automatic placements.
For budgeting and scheduling, you can start out with as little as a $1.00 a day. In this example, we choose $5.00. Your spend and budget will depend on your products and goals.
Set the optimization to Link Clicks and click “Continue.”
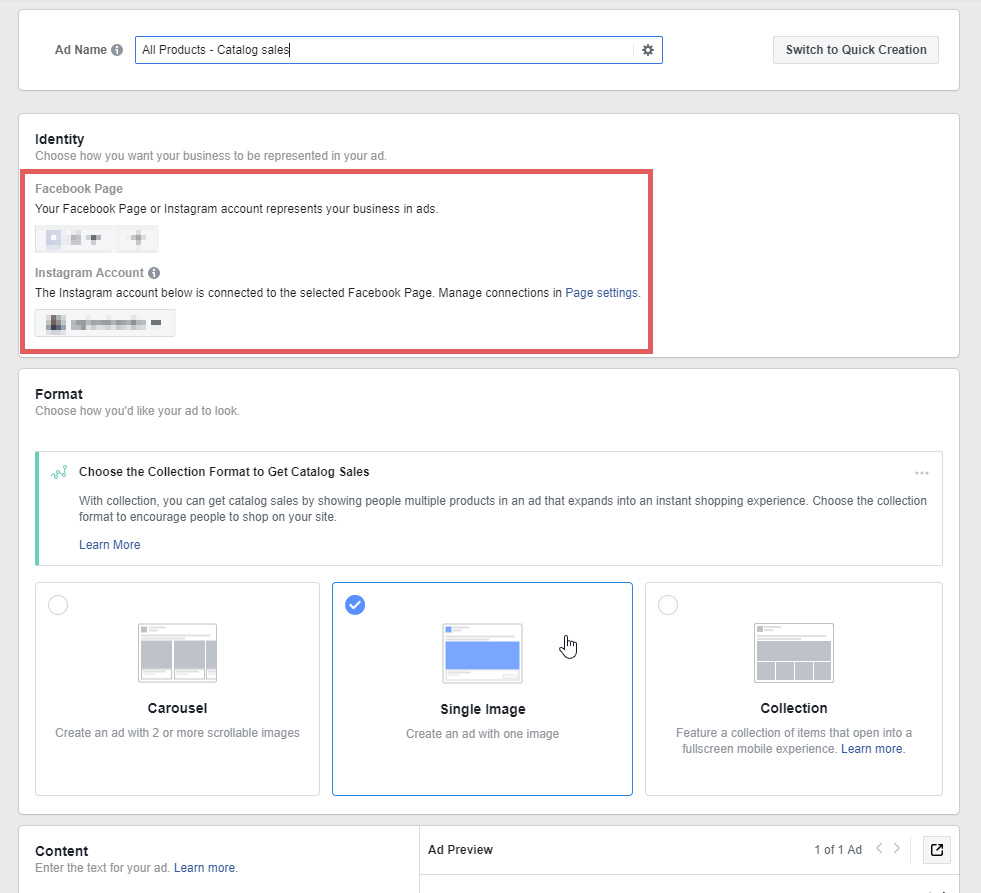
Select the Facebook Page and Instagram account to run your ads.
Then, choose your ad format. For this example, we'll be using the single image format.
The last step is filling out your ad copy.
In each field, you can click the plus icon to get a drop-down menu of dynamically generated options. For this example, we chose “Description.”
The headline works the same way. We chose “Product name.”
For the News Feed Link Description, we chose “Short description.”
Put yourself in the shoes of your customers, get creative, and fill out all relevant fields.
Be sure to review your ads before you publish them. When you're ready, you can click the "Confirm" button to finalize everything.

You did it, Congratulations!
Your Dynamic Product Ads should be live soon.
They should do the heavy lifting for you and will get more effective the more people you send to your site through your three-part funnel.
GoDataFeed supports Facebook catalog feeds for merchants that which to run Facebook Dynamic Product Ads, making it easier and more effective to upload and maintain store inventory data.
Contact us or book a demo to learn how!